Switching Between NetBird Accounts with Profiles
This page is adapted from NetBird documentation. NetBird is the upstream open-source project that QuFabric builds upon.
NetBird supports multiple profiles on a single device, making it easy to switch between work, home, or other networks. Only one profile is active at a time, and switching takes just a click.
This feature also allows you to switch between self-hosted and cloud-hosted QuFabric accounts seamlessly without needing to juggle multiple config files.

Watch a short demo GIF demonstrating how profile switching works here.
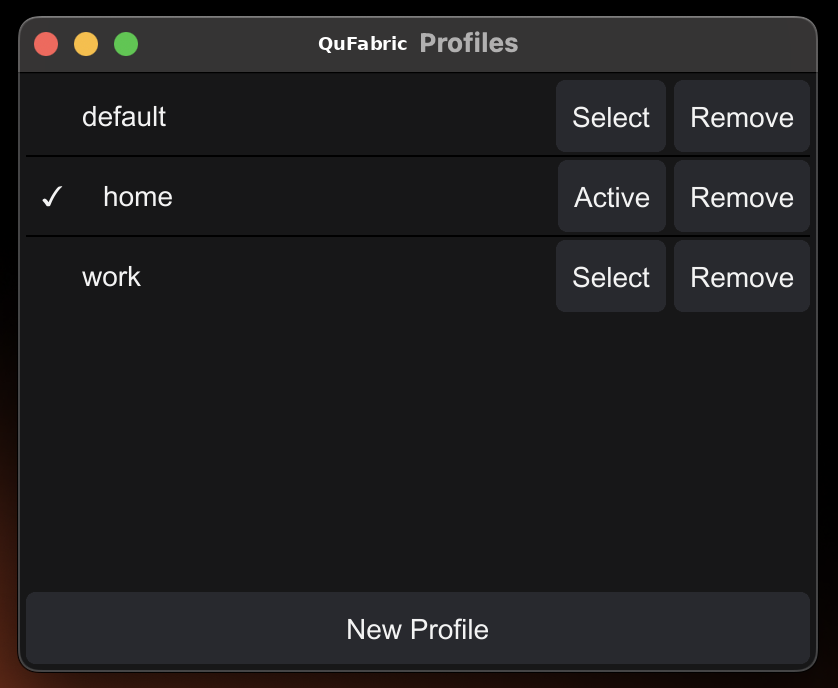
QuFabric Profiles GUI Quickstart
To get started with QuFabric profiles:
- Upgrade your client application to the latest QuFabric version.
- Run the GUI app
You will see a default profile created automatically.
Add more profiles by hovering over the default profile and clicking "Manage Profiles". After adding a new profile, select it to make it active.
You can now change the QuFabric settings, e.g., providing a self-hosted instance URL or allowing SSH. The new settings will be saved in the new profile. Click "Connect" to bring up the new profile.
The consequent selection of your profiles from the menu will automatically trigger the QuFabric client to connect to the network and authentication if needed.
Manage Profiles in the GUI
- Add a new profile with a friendly name input.
- Delete any inactive profile (trash icon).
- Active and default profiles cannot be removed.
What Is a Profile?
A profile is your QuFabric configuration bundle: WireGuard keys, login state, and network settings all in one file. Think of it as a separate "QuFabric account" on your machine:
- Default profile
Created automatically on first run or after upgrade. - Custom profiles
Any number of additional profiles you add yourself (e.g.work,home,test).
Profiles live in your system or user config folders:
| OS | Config path |
|---|---|
| Linux | /var/lib/qufabric/... |
| macOS | /var/lib/qufabric... |
| Windows | %ProgramData%\QuFabric\profiles\ |
Why Use Profiles?
- Seamless switching between multiple QuFabric networks/accounts
- No manual config files updates: all configs are managed through the CLI or GUI
- Persistent state: your last active profile reconnects on startup
- Safe defaults: you cannot remove the active/default profile by accident
Upgrading From an Older Version
If you're upgrading from QuFabric below version 0.52.0 that did not support profiles, here's what happens:
- During the first launch after the upgrade, your existing config
/etc/qufabric/config.json(or Windows equivalent) is automatically copied to a new profile nameddefault. - The
defaultprofile is set as active, and you can start using it immediately.
Disabling Profiles Feature
In some environments, you may want to disable the profiles feature entirely. This can be useful for:
- Managed environments where users should not be able to switch between different QuFabric accounts
- Security policies that require a single, fixed configuration
- Automated deployments where profile switching could interfere with operations
To disable the profiles feature, you can use the --disable-profiles flag when installing the service:
sudo qufabric service install --disable-profiles
Alternatively, you can set the QF_DISABLE_PROFILES environment variable:
export QF_DISABLE_PROFILES=true
sudo qufabric service install
When profiles are disabled:
- Users cannot create, switch, or remove profiles
- The profile management UI is disabled
- All profile-related CLI commands are disabled
- The client operates with a single, fixed configuration
- Profile switching is completely prevented
You can also disable update settings functionality using the --disable-update-settings flag or QF_DISABLE_UPDATE_SETTINGS environment variable. This prevents users from modifying any configuration settings, providing an additional layer of control in managed environments.
Profile CLI Commands
With the CLI, you can manage profiles easily. The main command is:
qufabric profile <add|list|select|remove> [name]
Add a New Profile
To create a new profile, use the command:
qufabric profile add <PROFILE_NAME>
For example, the command below creates a new profile named work:
qufabric profile add work
This command does the following in the background:
- Creates a
work.jsonfile in your config folder. - Keeps the client disconnected until you run
qufabric uporqufabric login. - Will throw an error if the profile with the same name already exists.
List Profiles
The command below lists all available profiles along with their status:
qufabric profile list
For example, running this command might output:
Found 3 profiles:
✓ work
✗ default
✗ home
- ✓ = active
- ✗ = inactive
Select (Switch) a Profile
To switch to a specific profile, use:
qufabric profile select <PROFILE_NAME>
For example, to switch to the home profile:
qufabric profile select home
The successful command will output:
Profile switched successfully to: home
If home hasn't been used before, you will need to run qufabric up or qufabric login to authenticate.
If the profile does not exist, you'll see an error message:
Error: profile home does not exist
Remove a Profile
To remove a profile, use:
qufabric profile remove <PROFILE_NAME>
For example, to remove the home profile:
qufabric profile remove home
If successful, you'll see:
Profile removed successfully: home
You can't remove an active profile. If the profile your are trying to remove is active, you'll see an error:
Cannot remove active profile: home
If the profile does not exist, you'll see an error message:
Error: profile home does not exist
The command does the following in the background:
- Removes
home.jsonandhome.state.jsonfiles from your config folder.
Using --profile Flags
--profile FlagsYou can use the --profile flag with any QuFabric CLI command to specify which profile to use for that command.
This is useful for running commands in a specific context without switching profiles manually.
qufabric up --profile work
qufabric login --profile home
QuFabric switches to the named profile then runs the command under the hood. If the profile is new and hasn't been used yet, you'll be prompted to authenticate.