Access Private Kubernetes Clusters with QuFabric Kubernetes Operator
Accessing private Kubernetes clusters can be challenging, especially when connecting from remote locations or having multiple clusters to manage. QuFabric Kubernetes operator simplifies this process by enabling secure access to your Kubernetes clusters using custom resource configurations and annotations to expose your cluster and services in your QuFabric network.
The QuFabric Kubernetes operator automatically creates Networks and Resources in your QuFabric account, allowing you to seamlessly access your Kubernetes services and control plane from your QuFabric network.
Deployment
Prerequisites
- (Recommended) helm version 3+
- kubectl version v1.11.3+.
- Access to a Kubernetes v1.11.3+ cluster.
- (Recommended) Cert Manager.
Using Helm
- Add helm repository.
helm repo add qufabric https://qufabric.github.io/helms
- (Recommended) Install cert-manager for k8s API to communicate with the QuFabric operator.
kubectl apply -f https://github.com/cert-manager/cert-manager/releases/download/v1.17.0/cert-manager.yaml
- Install the Gateway API CRDs.
kubectl apply --server-side -f https://github.com/kubernetes-sigs/gateway-api/releases/download/v1.5.0/experimental-install.yaml
- Add QuFabric API token. You can create a PAT by following the steps here.
kubectl create namespace qufabric
kubectl -n qufabric create secret generic qufabric-mgmt-api-key --from-literal=QF_API_KEY=nbp_iVkOxFHOpx5K3Gc7qMqwCTqBWkHRpH2KunpX
Replace ~/nb-pat.secret with your QuFabric API key.
- (Recommended) Create a
values.yamlfile, checkhelm show values qufabric/kubernetes-operatorfor more info.
# by default the managementURL points to the QuFabric cloud service: https://api.qufabric.io:443
# managementURL: "https://qufabric.example.io:443"
ingress:
  enabled: true

qufabricAPI:
  keyFromSecret:
    name: "qufabric-mgmt-api-key"
    key: "QF_API_KEY"
- Install using helm install:
helm install --create-namespace -f values.yaml -n qufabric qufabric-operator qufabric/kubernetes-operator
- Check installation
kubectl -n qufabric get pods
Output should be similar to:
NAME                                                    READY   STATUS    RESTARTS   AGE
qufabric-operator-kubernetes-operator-67769f77db-tmnfn   1/1     Running   0          42m
kubectl -n qufabric get services
Output should be similar to:
NAME                                                   TYPE        CLUSTER-IP        EXTERNAL-IP   PORT(S)    AGE
qufabric-operator-kubernetes-operator-metrics           ClusterIP   192.168.194.165   <none>        8080/TCP   47m
qufabric-operator-kubernetes-operator-webhook-service   ClusterIP   192.168.194.222   <none>        443/TCP    47m
7.(Optional) Install Routing Peer and Policies, create a values.yaml file, check helm show values qufabric/qufabric-operator-config for more info.
router:
  enabled: true
policies:
  default:
    name: Kubernetes Default Policy
    sourceGroups:
      - All
- Install using helm install:
helm install -f values.yaml -n qufabric qufabric-operator-config qufabric/qufabric-operator-config
Updating or Modifying the Operator Configuration
The configuration or version update of the operator can be done with helm upgrade:
Operator version updates
helm upgrade -f values.yaml -n qufabric qufabric-operator qufabric/kubernetes-operator
Configuration Update
helm upgrade -f values.yaml -n qufabric qufabric-operator-config qufabric/qufabric-operator-config
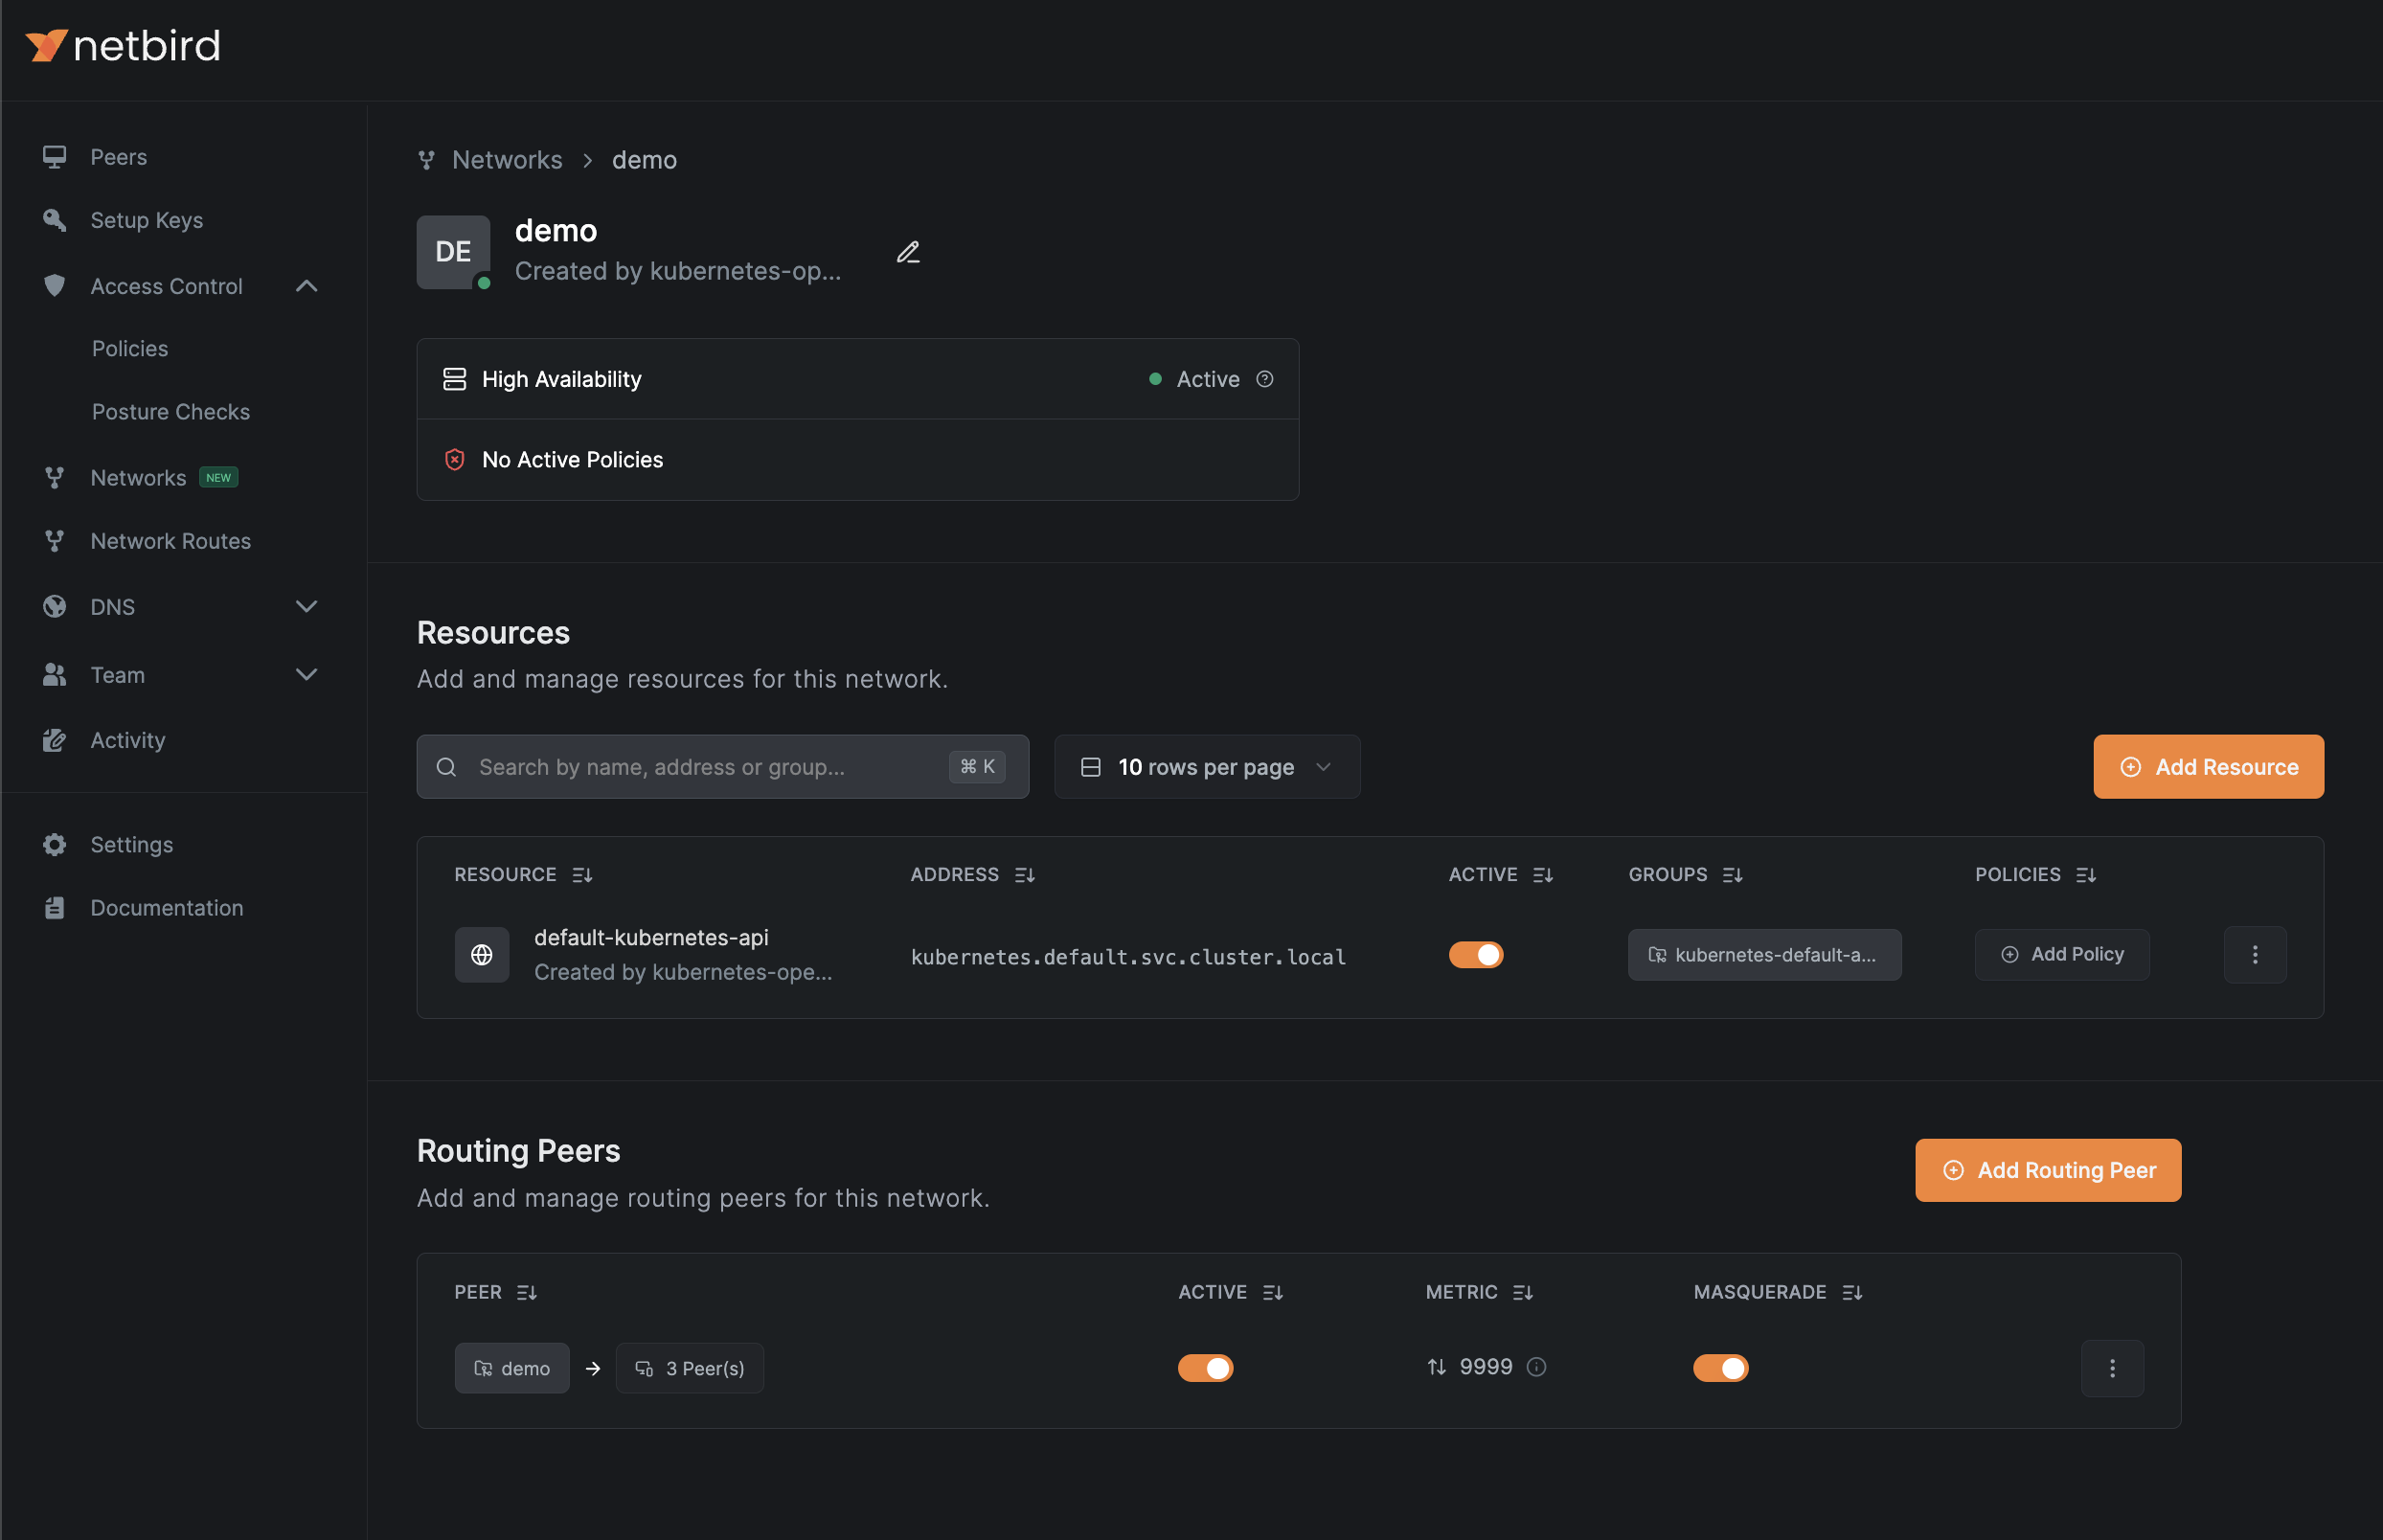
Expose Kubernetes Control Plane to your QuFabric Network
To access your Kubernetes control plane from a QuFabric network, you can expose your Kubernetes control plane as a QuFabric resource by enabling the following option in the qufabric-operator-config values:
kubernetesAPI:
  enabled: true
The operator will create a QuFabric network resource similar to the example below:
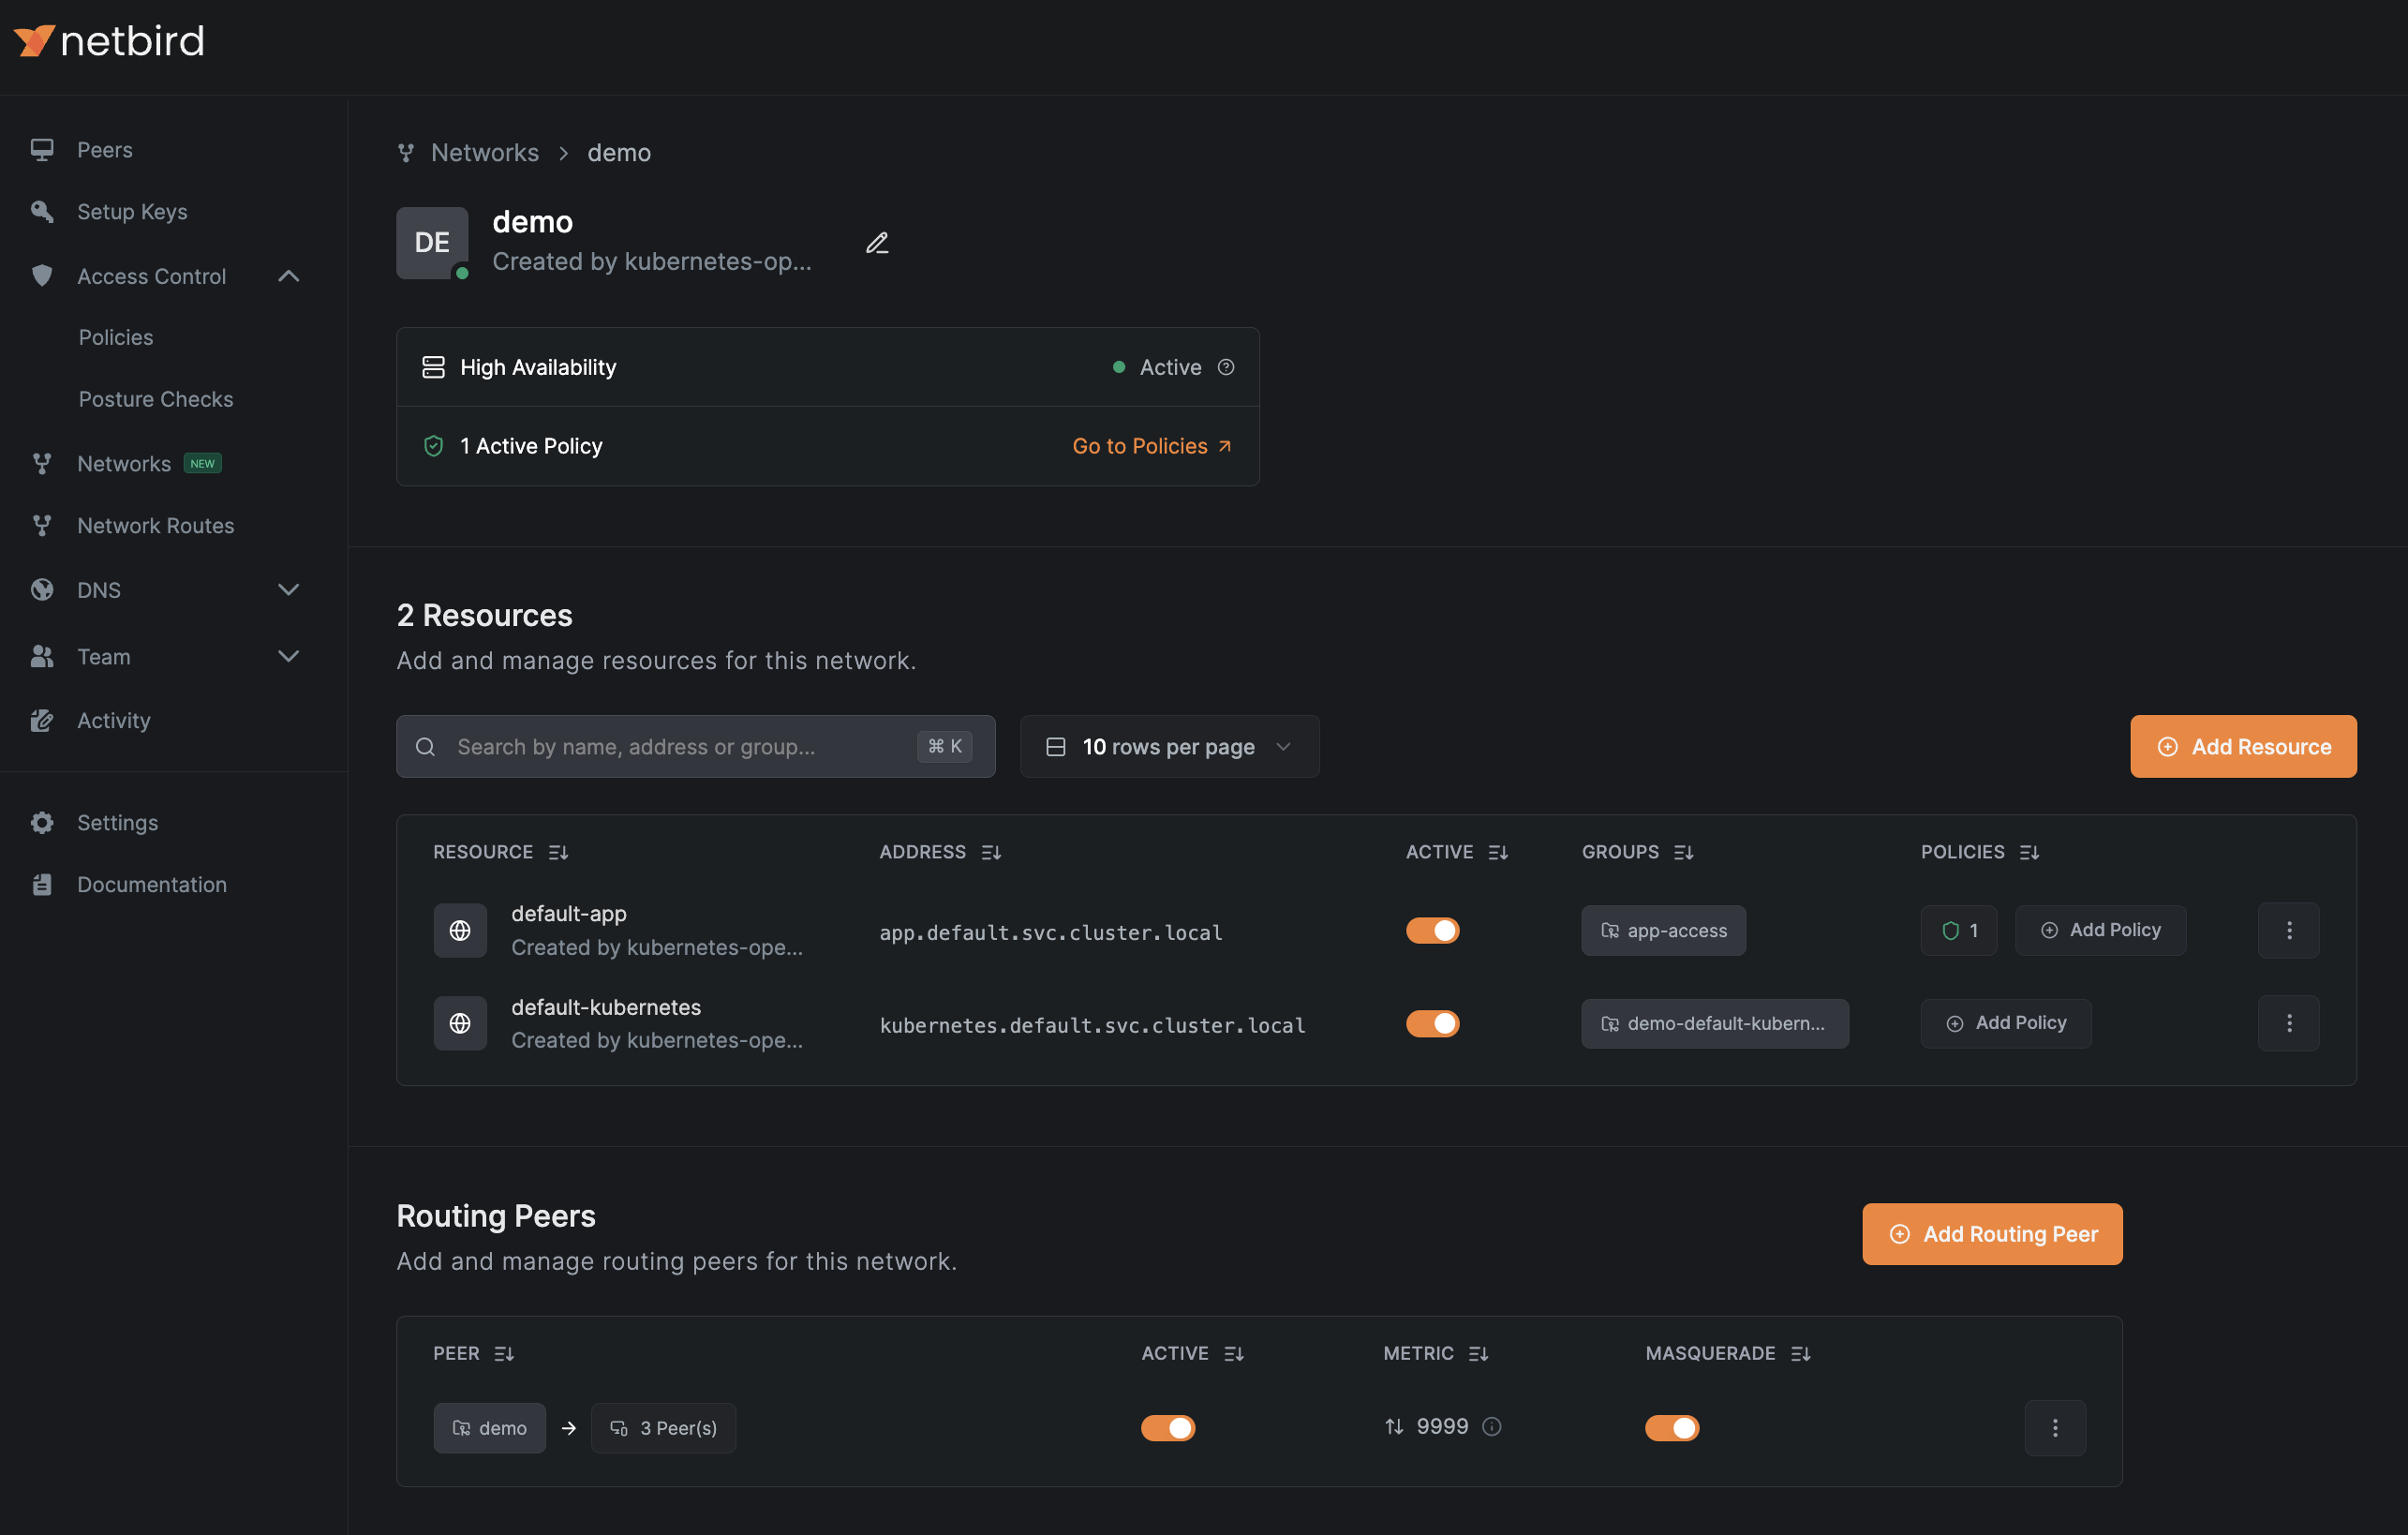
Expose Kubernetes Services to QuFabric Network
Kubernetes services is a common way to route traffic to your application pods. With the QuFabric operator ingress you can expose services to your
QuFabric network as resources by using annotations in your services. The operator will create networks, resources,
and add routing peers to your QuFabric configuration.
By default, the ingress configuration is disabled. You can enable it with the following values using the qufabric-operator-config helm chart:
router:
  enabled: true
You can expose services using the annotations qufabric.io/expose: "true" and qufabric.io/groups: "resource-group"; see the example below:
apiVersion: v1
kind: Service
metadata:
  name: app
  annotations:
    qufabric.io/expose: "true"
    qufabric.io/groups: "app-access"
spec:
  selector:
    app: app
  ports:
    - protocol: TCP
      port: 8080
      targetPort: 80
  type: ClusterIP
This will create a Network and a resource similar to the example below:
Ingress DNS Resolution requires enabled DNS Wildcard Routing and at least one DNS Nameserver configured for clients.
Learn more about Networks settings here.
Other annotations can be used to further configure the resources created by the operator:
| Annotation | Description | Default | Valid Values |
|---|---|---|---|
qufabric.io/expose | Expose service using QuFabric Network Resource | (null, true) | |
qufabric.io/groups | Comma-separated list of group names to assign to Network Resource. If non-existing, the operator will create them for you. | {ClusterName}-{Namespace}-{Service} | Any comma-separated list of strings. |
qufabric.io/resource-name | Network Resource name | {Namespace}-{Service} | Any valid network resource name, make sure they're unique! |
qufabric.io/policy | Name(s) of NBPolicy to propagate service ports as destination. | Comma-separated list of names of any NBPolicy resource | |
qufabric.io/policy-ports | Narrow down exposed ports in a policy. Leave empty for all ports. | Comma-separated integer list, integers must be between 0-65535 | |
qufabric.io/policy-protocol | Narrow down protocol for use in a policy. Leave empty for all protocols. | (tcp,udp) |
Control Access to Your Kubernetes Resources with Access Control Policies
By default, resources created by the operator will not have any access control policies assigned to them.
To allow the operator to manage your access control policies, configure policy bases in your values.yaml file.
In this file, you can define source groups, name suffixes, and other settings related to access control policies.
Afterward, you can tag the policies in your service annotations using the annotation qufabric.io/policy: "policy-base".
See the examples values.yaml for qufabric-operator-config below:
router:
  enabled: true
policies:
  app-users:
    name: App users # Required, name of policy in QuFabric console
    description: Policy for app users access # Optional
    sourceGroups: # Required, name of groups to assign as source in Policy.
      - app-users
    protocols: # Optional, restricts protocols allowed to resources, defaults to ['tcp', 'udp'].
      - tcp
    bidirectional: false
  k8s-admins:
    name: App admins
    sourceGroups:
      - app-admins
After adding the policy base and applying the configuration,
you can use the app-users and k8s-admins bases for your services and Kubernetes API configurations.
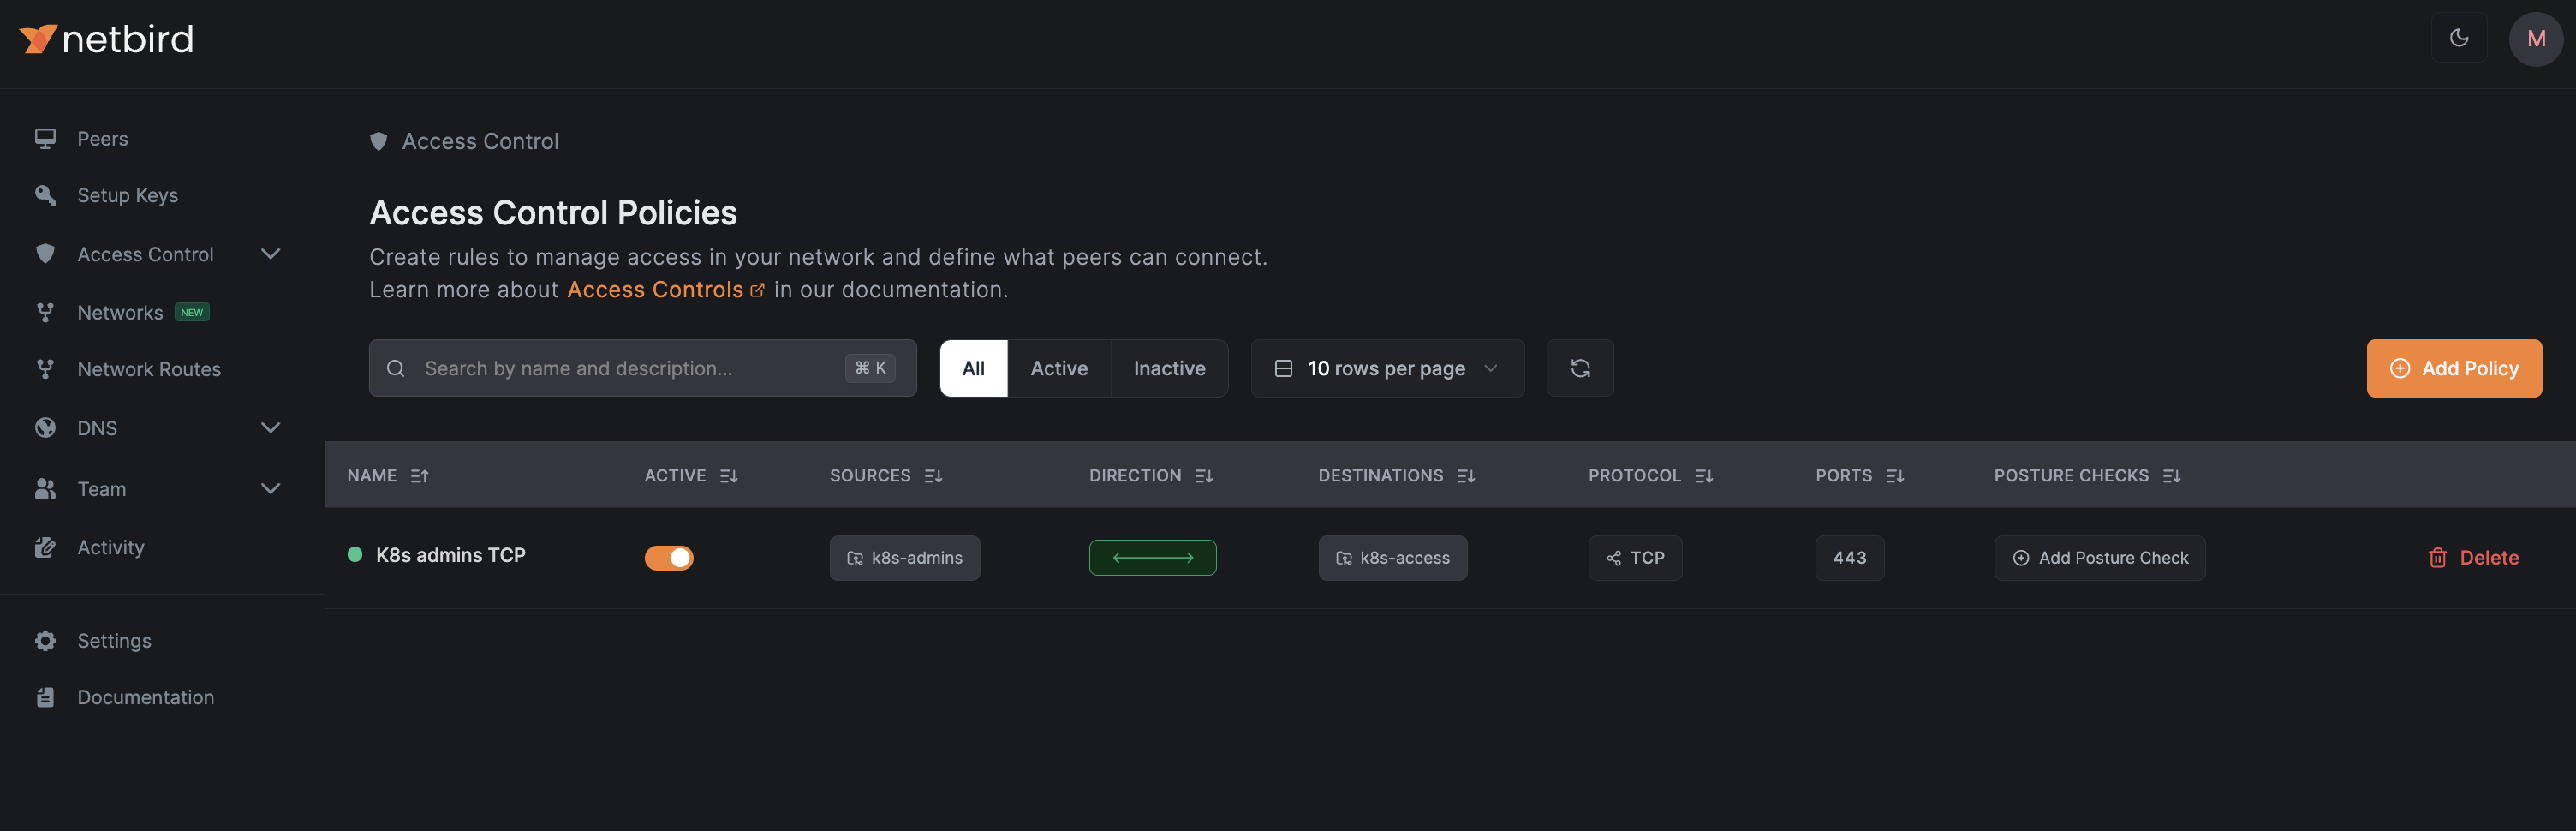
Linking Policy Bases to the Kubernetes API Service
To link a policy base to the Kubernetes API, we need to update the operator configuration by adding the policy and groups to the kubernetesAPI key in qufabric-operator-config as follows:
kubernetesAPI:
  enabled: false
  groups:
    - k8s-access
  policies:
    - k8s-admins
After updating and applying the configuration, you should see a policy similar to the one below:
Linking Policy Bases to Kubernetes Services
You can link policy bases with the annotation qufabric.io/policy: where you can simply add one or more bases to the service,
see the example below where we link the base "app-users" to our app service:
apiVersion: v1
kind: Service
metadata:
  name: app
  annotations:
    qufabric.io/expose: "true"
    qufabric.io/groups: "app-access"
    qufabric.io/policy: "app-users"
spec:
  selector:
    app: app
  ports:
    - protocol: TCP
      port: 8080
      targetPort: 80
  type: ClusterIP
The operator will create a policy in your management account similar to the one below:

You can reference multiple policy bases using a comma separated list of policy bases: qufabric.io/policy: "app-users,app-admins"
Policy auto-creation
- Ensure
ingress.allowAutomaticPolicyCreationis set to true in the Helm chart and apply. - Annotate a service with
qufabric.io/policywith the name of the policy as a kubernetes object, for examplequfabric.io/policy: default. This will create an NBPolicy with the namedefault-<Service Namespace>-<Service Name>. - Annotate the same service with
qufabric.io/policy-source-groupswith a comma-separated list of group names to allow as a source, for examplequfabric.io/policy-source-groups: dev. - (Optional) Annotate the service with
qufabric.io/policy-namefor a human-friendly name, for examplequfabric.io/policy-name: "default:Default policy for kubernetes cluster". Example:
apiVersion: v1
kind: Service
metadata:
  name: app
  annotations:
    qufabric.io/expose: "true"
    qufabric.io/groups: "app-access"
    qufabric.io/policy: "app-users"
    qufabric.io/policy-source-groups: "dev"
    qufabric.io/policy-name: "dev:Developers to app"
spec:
  selector:
    app: app
  ports:
    - protocol: TCP
      port: 8080
      targetPort: 80
  type: ClusterIP
If a policy already exists with the name specified in qufabric.io/policy, the other settings will be ignored in favor of the existing policy.
Accessing Remote Services Using Sidecars
To access services running in different locations from your Kubernetes clusters, you can deploy QuFabric sidecars—additional containers that run alongside your Kubernetes service containers within the same pod.
A QuFabric sidecar joins your network as a regular peer and becomes a subject to access control, routing, and DNS configurations as any other peer in your QuFabric network. This allows your Kubernetes application traffic to be securely routed through the QuFabric network, enabling egress-like access to remote services from your Kubernetes services across various locations or cloud providers.
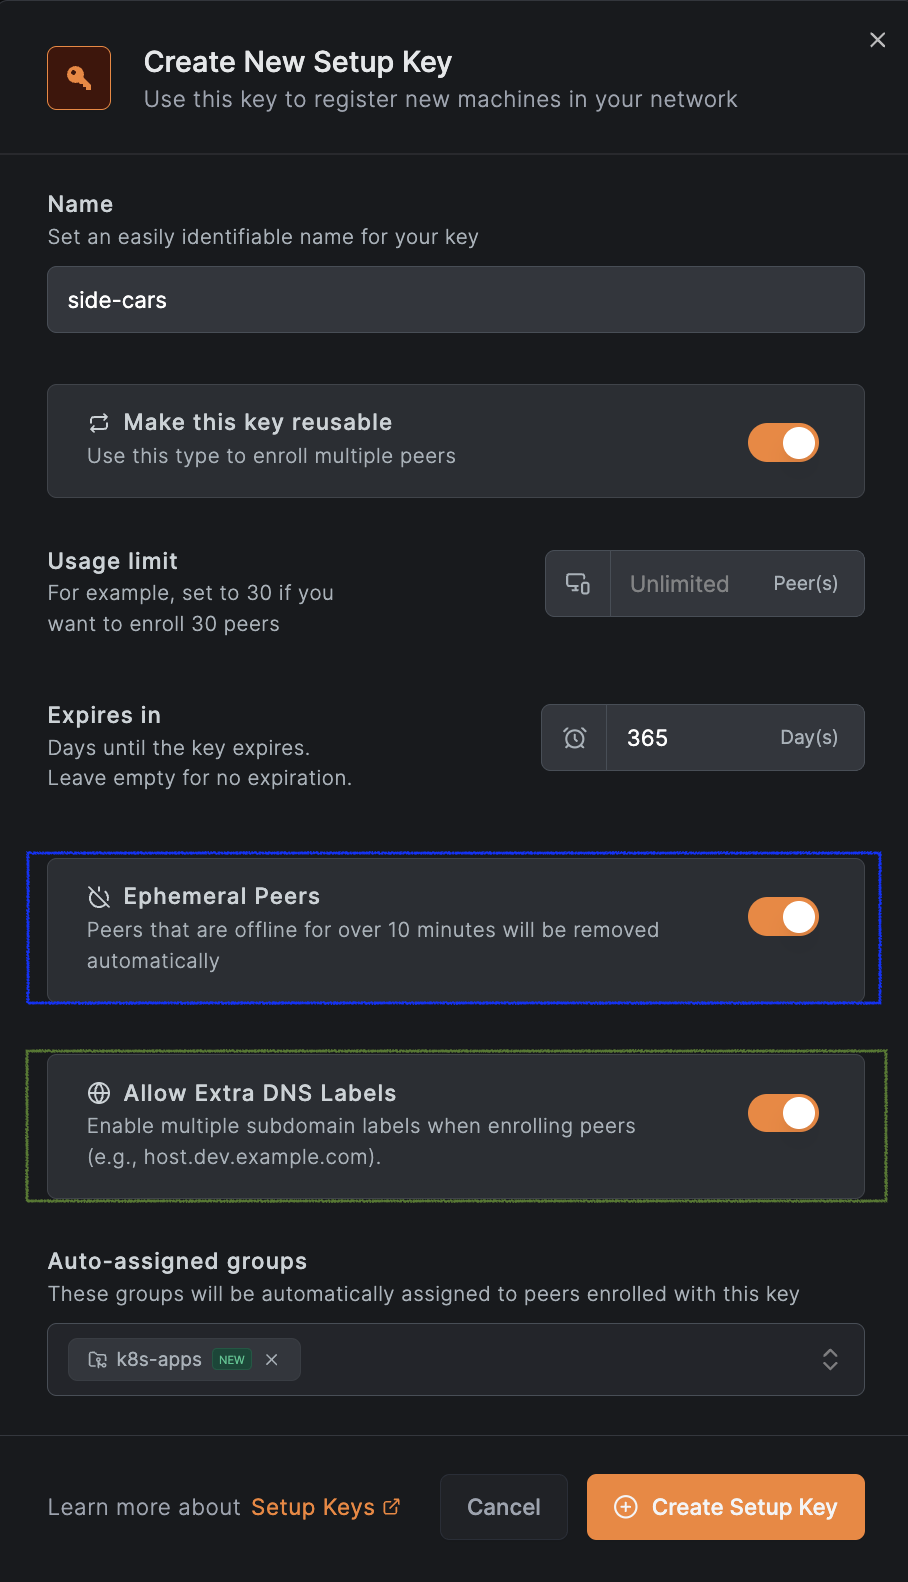
To enable sidecar functionality in your deployments, you first need to generate a setup key, either via the UI (see image below) or by following this guide for more details.

Next, you'll create a secret in Kubernetes and add a new resource called NBSetupKey. The NBSetupKey name can then be
referenced in your deployments or daemon sets to specify which setup key should be used when injecting a sidecar into
your application pods. Below is an example of a secret and an NBSetupKey resource:
apiVersion: v1
stringData:
  setupkey: EEEEEEEE-EEEE-EEEE-EEEE-EEEEEEEEEEEE
kind: Secret
metadata:
  name: app-setup-key
NBSetupKey:
apiVersion: qufabric.io/v1
kind: NBSetupKey
metadata:
  name: app-setup-key
spec:
  # Optional, overrides management URL for this setupkey only
  # defaults to https://api.qufabric.io
  # managementURL: https://qufabric.example.com
  secretKeyRef:
    name: app-setup-key # Required
    key: setupkey # Required
After adding the resource, you can reference the NBSetupKey in your deployments or daemon-sets as shown below:
kind: Deployment
...
spec:
...
  template:
    metadata:
      annotations:
        qufabric.io/setup-key: app-setup-key # Must match the name of an NBSetupKey object in the same namespace
...
    spec:
      containers:
...
Init Sidecar Mode
By default, the QuFabric container is injected as a regular sidecar container. For workloads like Jobs and CronJobs where the pod
should terminate after the main container completes, you can use init sidecar mode. This injects QuFabric as an init container
with restartPolicy: Always.
To enable init sidecar mode, add the following annotation:
qufabric.io/init-sidecar: "true"
Below is an example of a Job using init sidecar mode:
kind: Job
...
spec:
...
  template:
    metadata:
      annotations:
        qufabric.io/setup-key: app-setup-key # Must match the name of an NBSetupKey object in the same namespace
        qufabric.io/init-sidecar: "true"
...
    spec:
      containers:
...
Using Extra Labels to Access Multiple Pods Using the Same Name
Starting with v0.27.0, QuFabric supports extra DNS labels, allowing you to define extended DNS names for peers. This enables grouping peers under a shared DNS name and distributing traffic using DNS round-robin load balancing.
To use this feature, create a setup key with the “Allow Extra DNS Labels” option enabled. See the example below for reference:
And add the annotation qufabric.io/extra-dns-labels to your pod; see the example below:
kind: Deployment
...
spec:
...
  template:
    metadata:
      annotations:
        qufabric.io/setup-key: app-setup-key # Must match the name of an NBSetupKey object in the same namespace
        qufabric.io/extra-dns-labels: "app"
...
    spec:
      containers:
...
With this setup, other peers in your QuFabric network can reach these pods using the domain app.<QUFABRIC_DOMAIN>
(e.g., for QuFabric cloud, app.qufabric.cloud). The access will be made using a DNS round-robin fashion for multiple pods.
Uninstallation
v0.2.0+
To uninstall the QuFabric Kubernetes Operator and its associated resources, you can use the following Helm commands:
helm uninstall -n qufabric qufabric-operator-config
helm uninstall -n qufabric kubernetes-operator
Order of uninstallation is important; make sure to uninstall qufabric-operator-config first to avoid orphaned resources. If you have any routing peers or policies in the cluster, uninstalling kubernetes-operator first may lead to issues.
< v0.2.0
To uninstall the QuFabric Kubernetes Operator and its associated resources, you'll need to manually delete all NBRoutingPeers and NBPolicies created by the operator before uninstalling the Helm chart. You can do this using the following commands:
kubectl -A delete nbroutingpeers --all
kubectl delete nbpolicies --all
helm uninstall -n qufabric kubernetes-operator-operator
NBRoutingPeer deletion will be blocked if there are any Services with the annotation qufabric.io/expose: "true" present in the cluster. Make sure to remove the annotation from those Services or delete the Services themselves before proceeding with the deletion of NBRoutingPeers.
Make sure to delete all NBRoutingPeers and NBPolicies before uninstalling the Helm chart to avoid orphaned resources.
Upgrade Notes
Upgrading from Helm Chart v0.1.0 to v0.2.0 and above
Starting from version v0.2.0, the QuFabric Kubernetes Operator Helm chart has been split into two separate charts:
kubernetes-operator: This chart contains the core operator functionality.qufabric-operator-config: This chart is responsible for configuring the QuFabric operator, including routing peers and policies.
The configuration files responsible for creating NBRoutingPeers and NBPolicies have been moved to the qufabric-operator-config chart, allowing for easier uninstallation of the operator without affecting existing routing peers and policies, as well as uninstalling configuration with a proper cleanup.
During Helm versions v0.2.x, kubernetes-operator chart will still install NBRoutingPeers and NBPolicies if they are defined in the values.yaml file. However, this behavior will be deprecated in future releases. It is recommended to migrate your configuration to the qufabric-operator-config chart to ensure compatibility with future updates.
You can migrate to the new chart by following these steps:
- Create a new
values.yamlfile for thequfabric-operator-config - Move the routing peer and policy configurations from your existing
values.yamlfile to the new file. - Install or upgrade the
qufabric-operator-configchart using Helm with the newvalues.yamlfile using the--take-ownershipflag.
helm install -f values.yaml -n qufabric qufabric-operator-config qufabric/qufabric-operator-config --take-ownership
- Remove routing peer and policy configurations from the
kubernetes-operatorvalues.yamlfile to avoid duplication. - Upgrade the
kubernetes-operatorchart using Helm with the updatedvalues.yamlfile.
helm upgrade -f values.yaml -n qufabric qufabric-operator qufabric/kubernetes-operator
Get started
- Make sure to star us on GitHub
- Follow us on X
- Join our Slack Channel
- QuFabric latest release on GitHub