Deploying QuFabric's with Jamf Pro
Integrating QuFabric with Jamf Pro's robust device management capabilities creates a scalable system for secure access management across your entire Apple ecosystem.
This comprehensive tutorial guides you through deploying QuFabric on Apple devices using Jamf Pro, covering:
- Setting up QuFabric Access Policies for Team-Specific Permissions
- Creating a Jamf Pro Policy for Automated QuFabric Deployment
- Verifying the Automated Provisioning Process
By following these steps, you'll establish an automated pipeline that:
- Streamlines network security management
- Minimizes manual configuration errors
- Ensures appropriate access levels for each team in your organization
This integration enhances your organization's security posture while simplifying remote access management for your Apple devices.
Prerequisites
Before beginning the integration process, make sure you have the following:
- A QuFabric account with administrative privileges.
- A Jamf Pro subscription with administrative permissions.
- A valid Jamf Pro Push Certificate.
- At least one Apple device (Mac, iPhone, or iPad) enrolled in Jamf Pro.
These requirements are essential for successfully implementing QuFabric-Jamf Pro integration and managing your Apple devices securely.
Setting Up QuFabric Access Policies for Team-Specific Permissions
QuFabric's Access Control Policies are essential to this integration, allowing you to define and enforce specific permissions for different user groups. This ensures that team members can only access the resources necessary for their roles.
For this tutorial, we'll create a policy that allows the Support team to access the Servers group:
- Log in to your QuFabric dashboard.
- Navigate to
Access Control > Policiesand clickAdd Policy. - Set the source group to
Supportand the destination group toServers. - Configure the appropriate protocol and port settings (e.g., TCP 22 for SSH access).
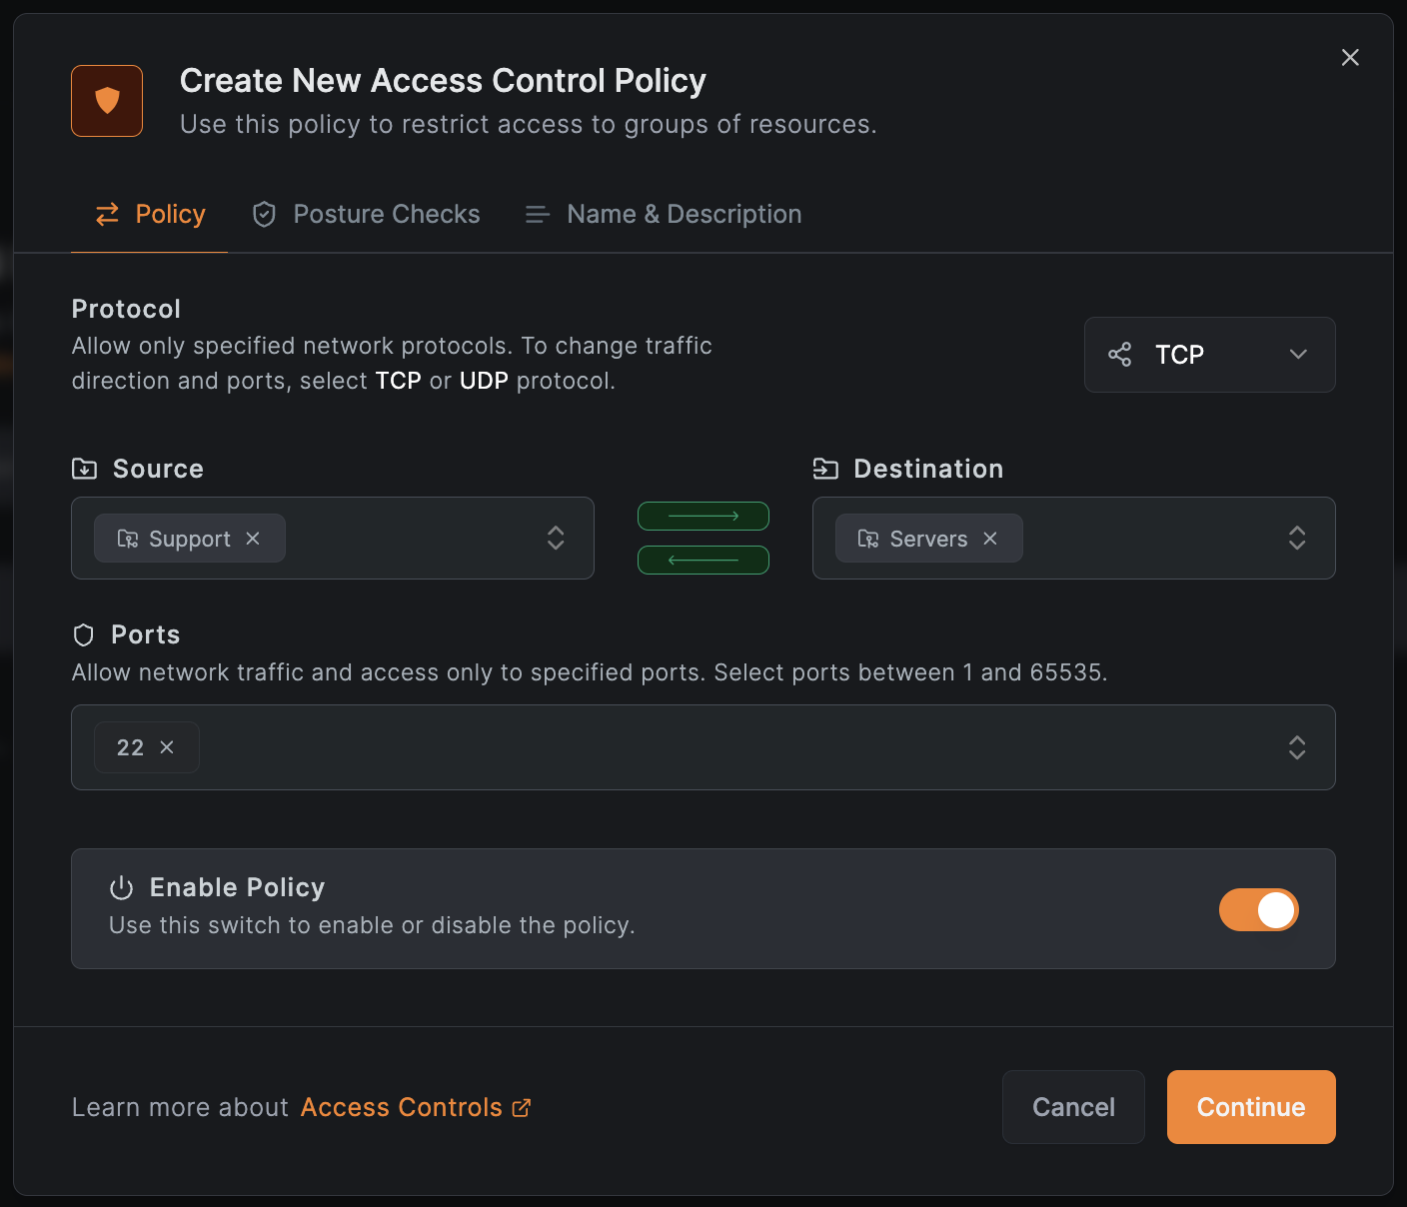
Give the policy a descriptive name (e.g., "Support team remote access") and click Save to create the policy.
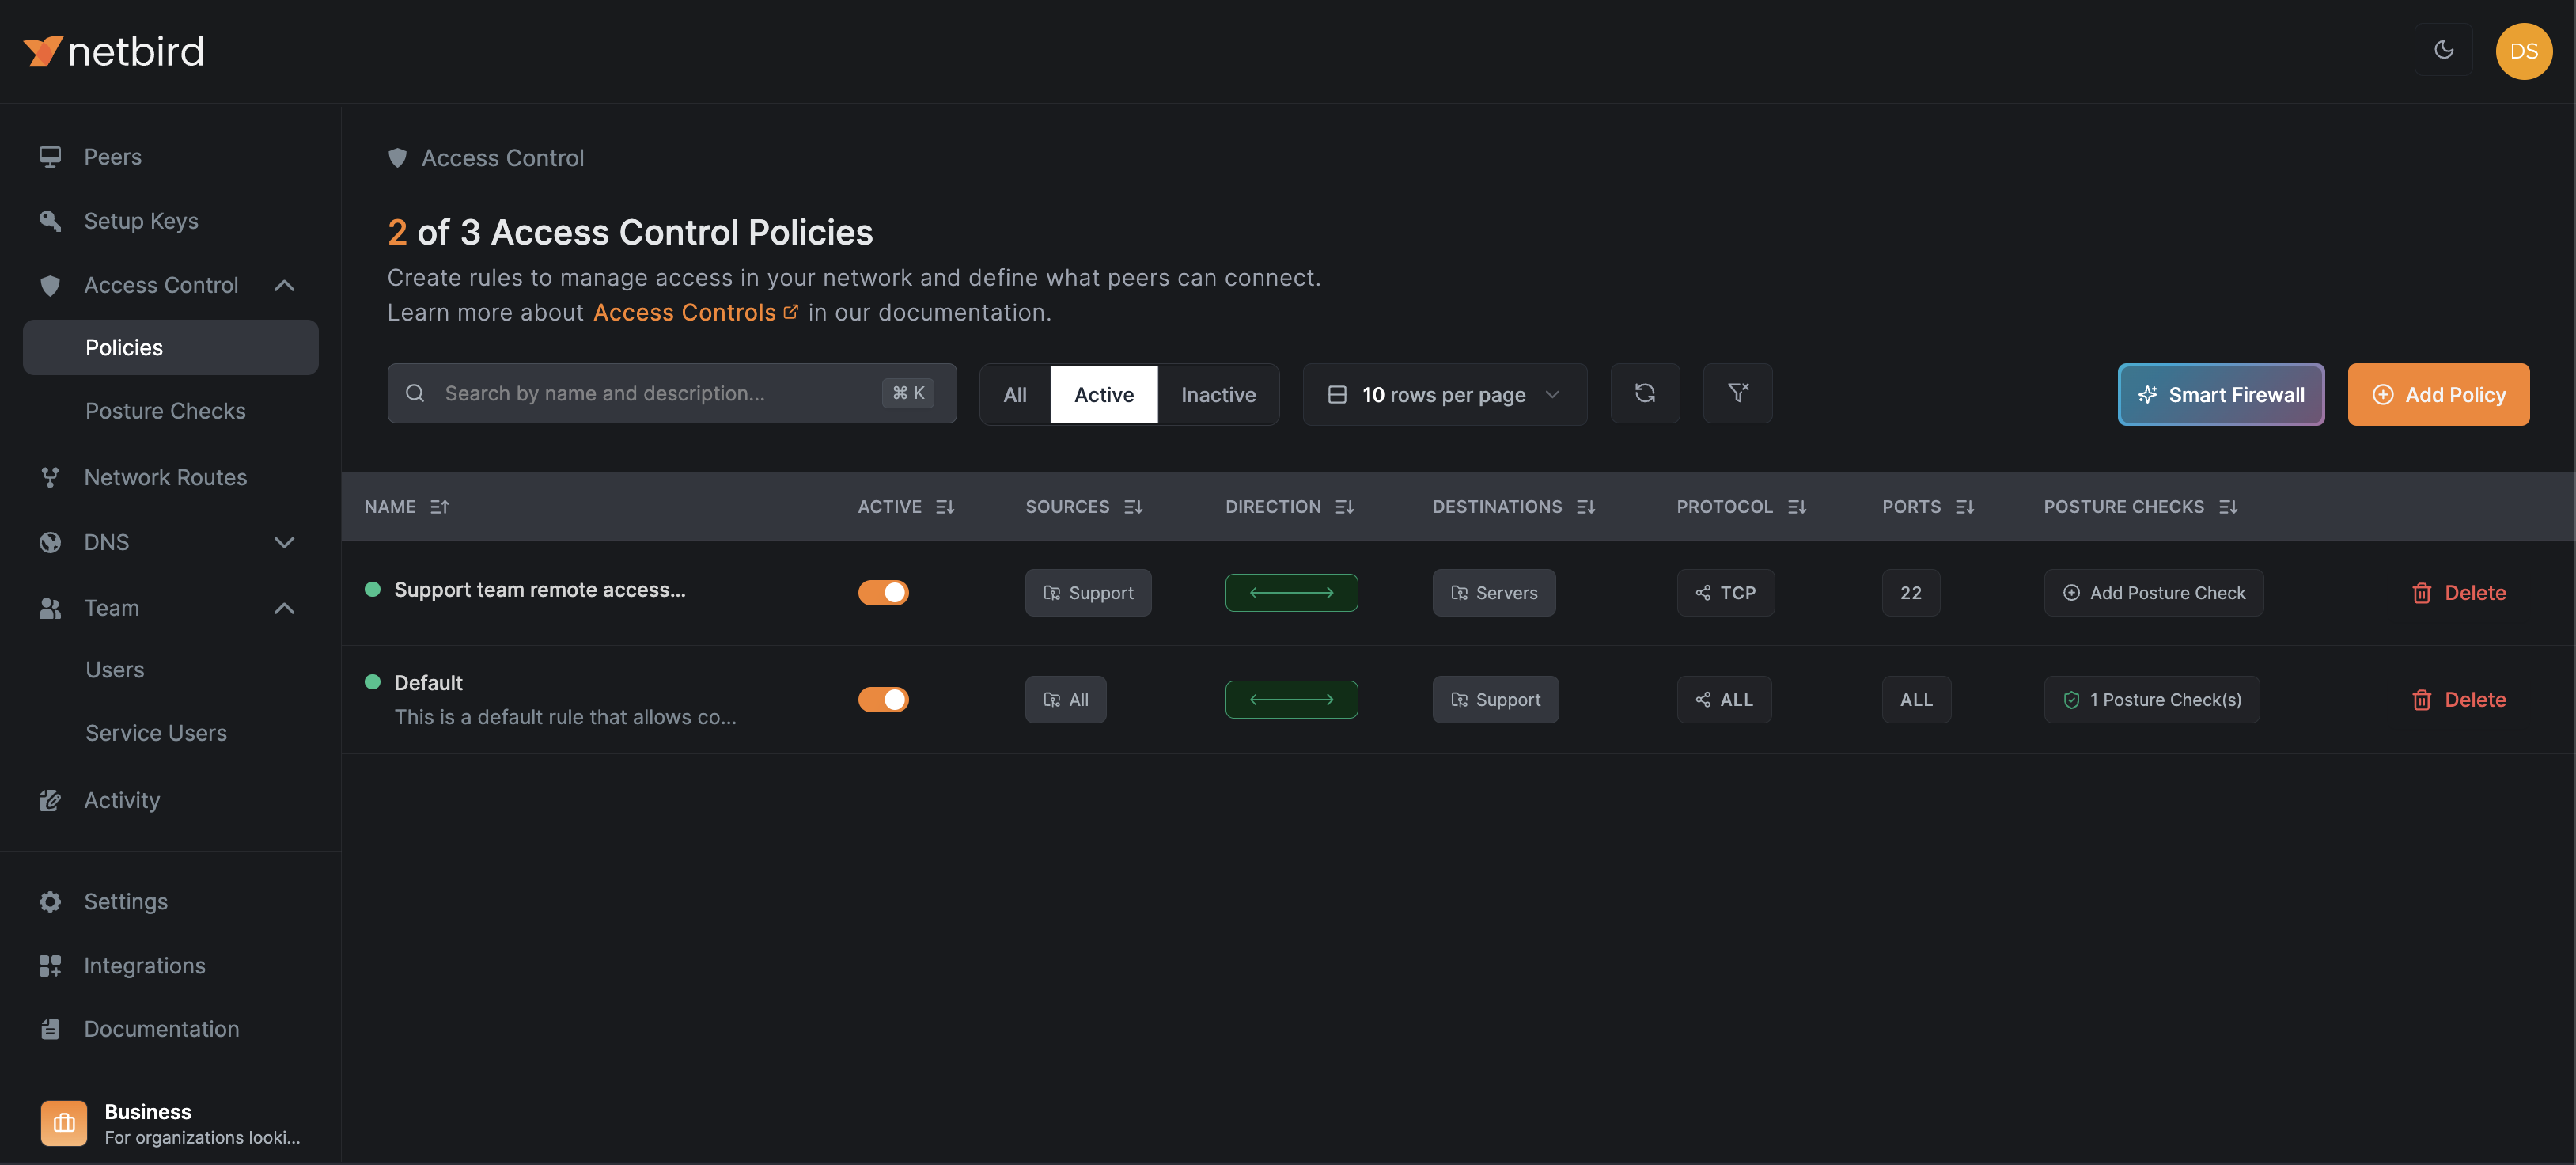
With this policy in place, any device assigned to the Support group will gain access to the Servers group as defined in the Access Control Policy.
Now that QuFabric is configured, let's proceed to the next step: setting up Jamf Pro to deploy QuFabric on support team devices.
Creating Jamf Pro Policy for Automated QuFabric Deployment
To deploy QuFabric using Jamf Pro, you need to upload the QuFabric package to Jamf and then configure a policy that includes the package.
Uploading QuFabric Package
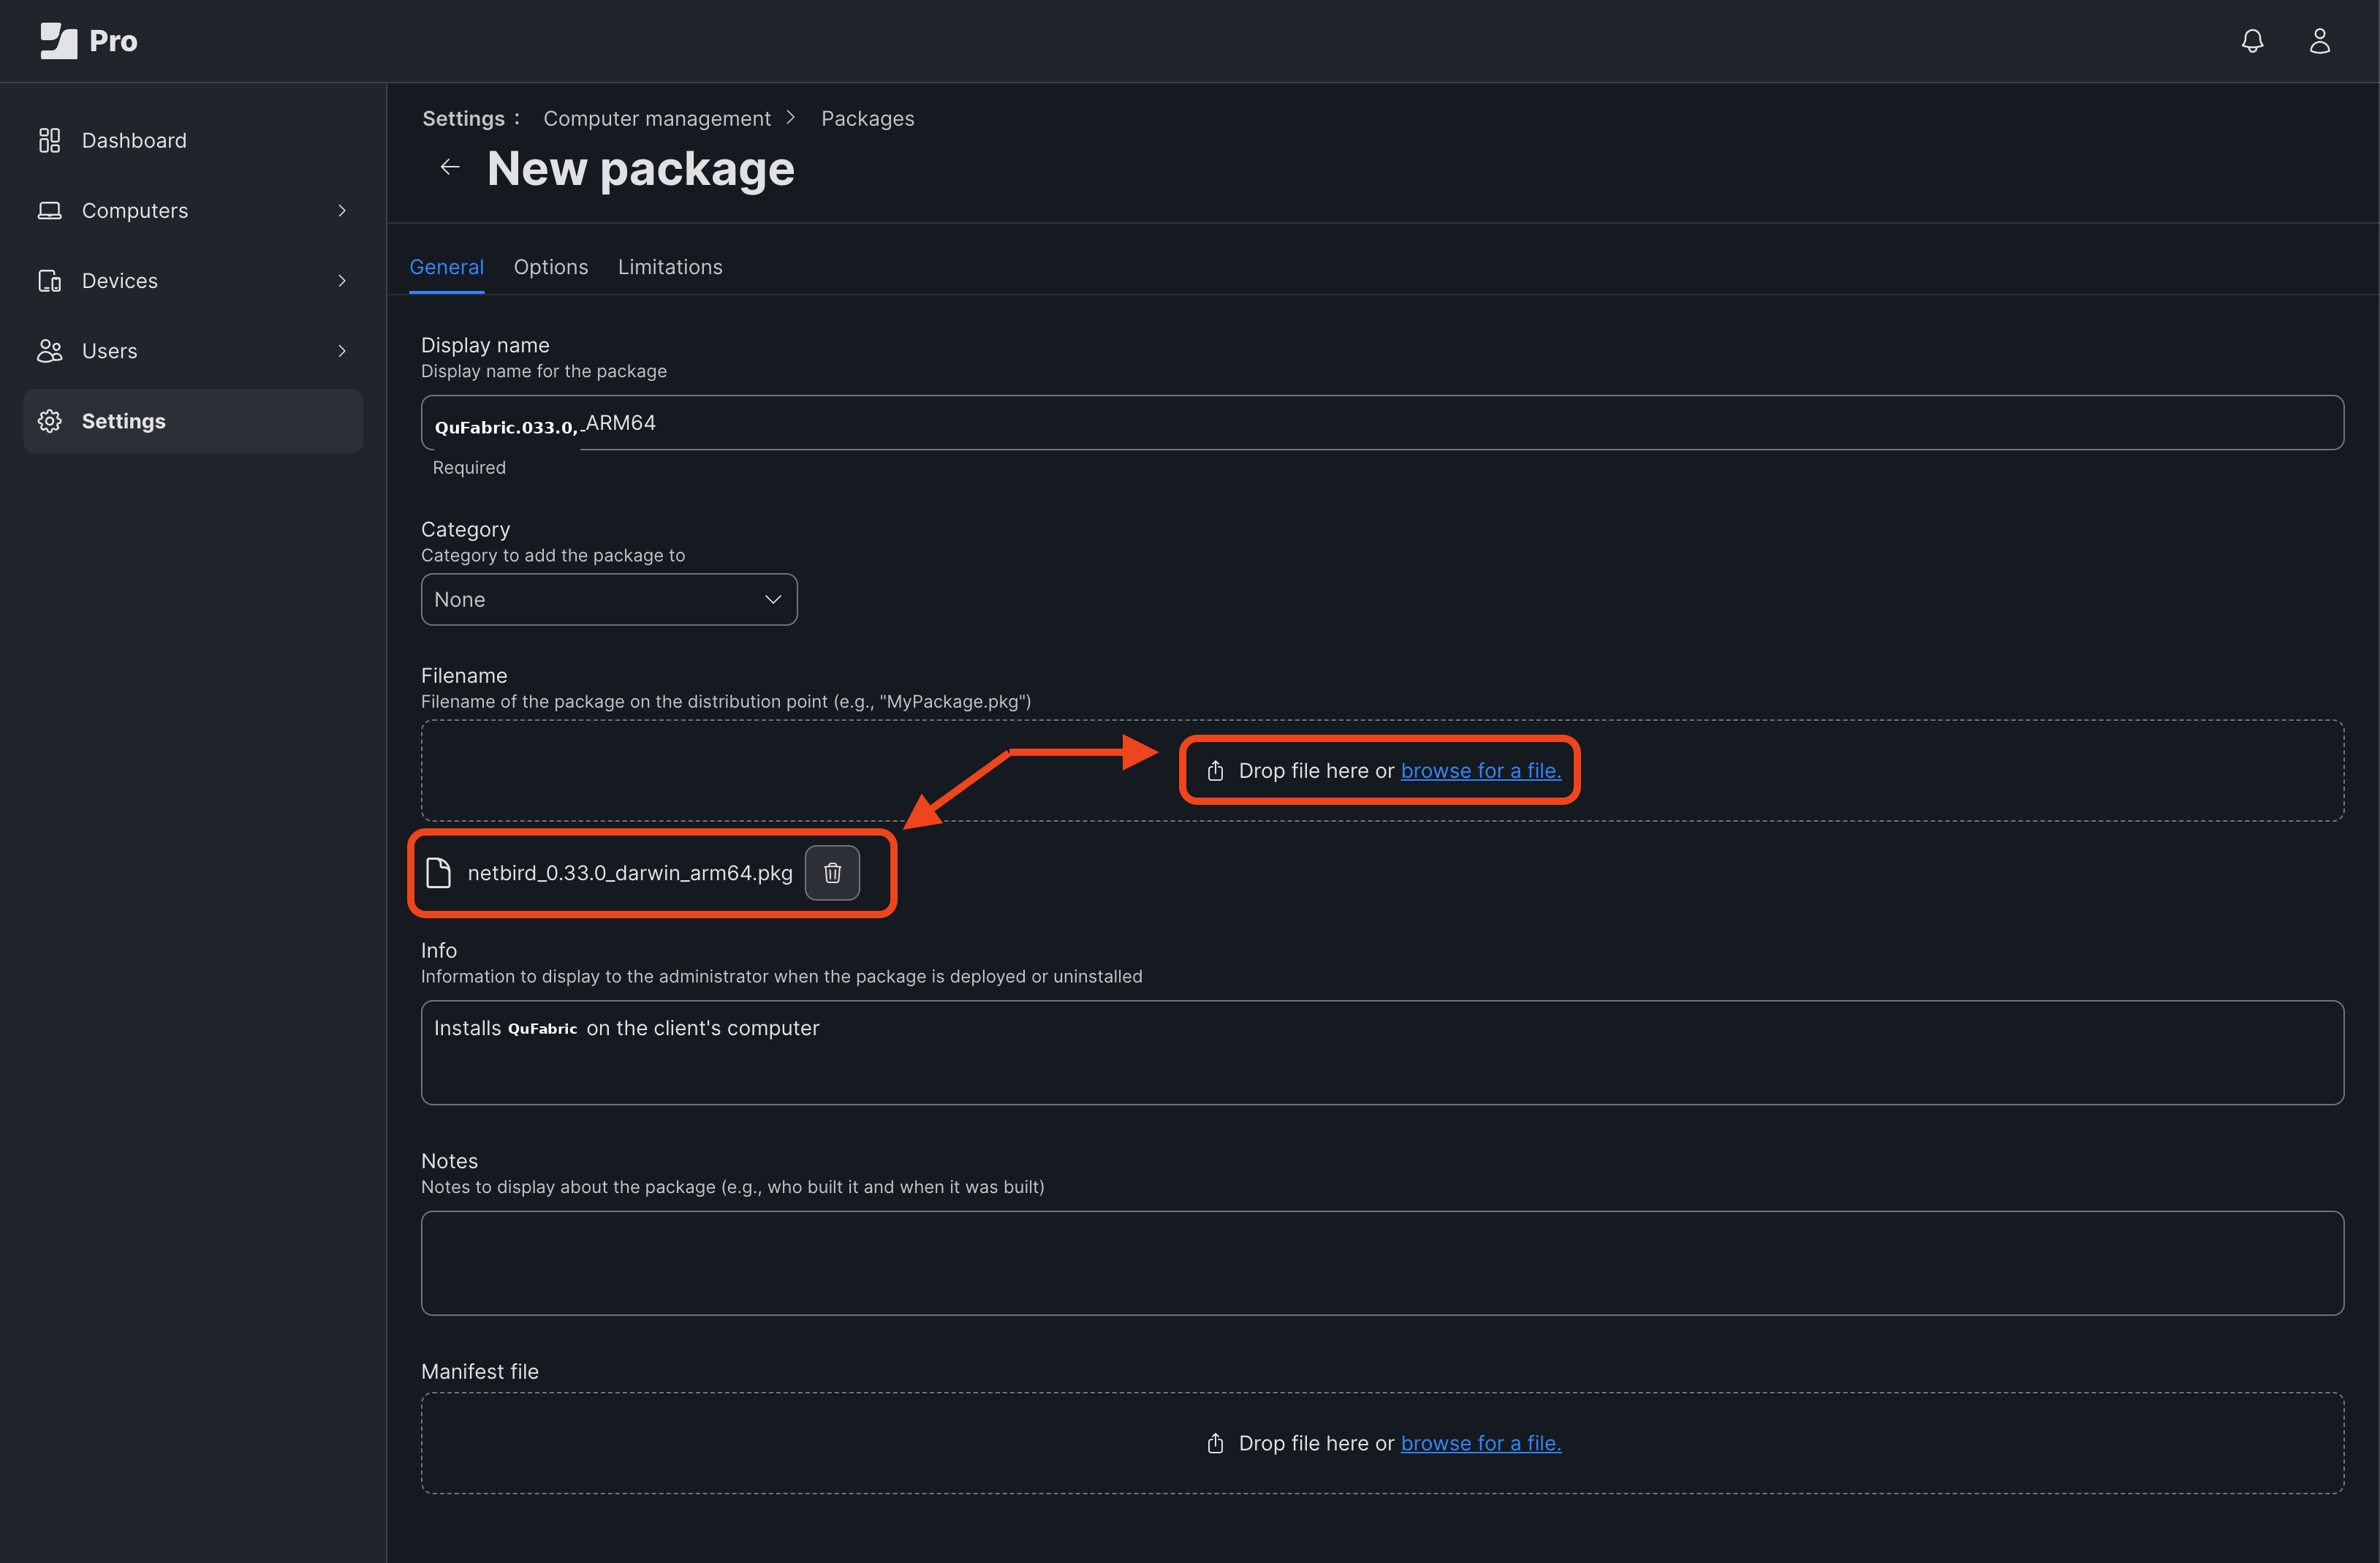
Navigate to Settings > Computer management > Packages and click + New.
In the General tab:
- Enter a descriptive Display name (e.g., QuFabric_vX.XX_Support_Team, where X.XX is the current QuFabric version).
- Optionally, assign a Category (e.g., VPN).
- Upload or drop the package file in the Filename field. This tutorial uses the Apple Silicon package you can download here.
- Optionally, add Info and Notes.
In the Options tab:
- Set a Priority (default is 10).
- The priority determines the order in which packages are installed when multiple packages are included in a policy. Lower numbers indicate higher priority (e.g., 1 is a higher priority than 10). Use this to ensure critical packages are installed before QuFabric if needed.
Click Save to finish. If you see the message "Availability pending", click Refresh to update the package status.
Creating a Policy for QuFabric
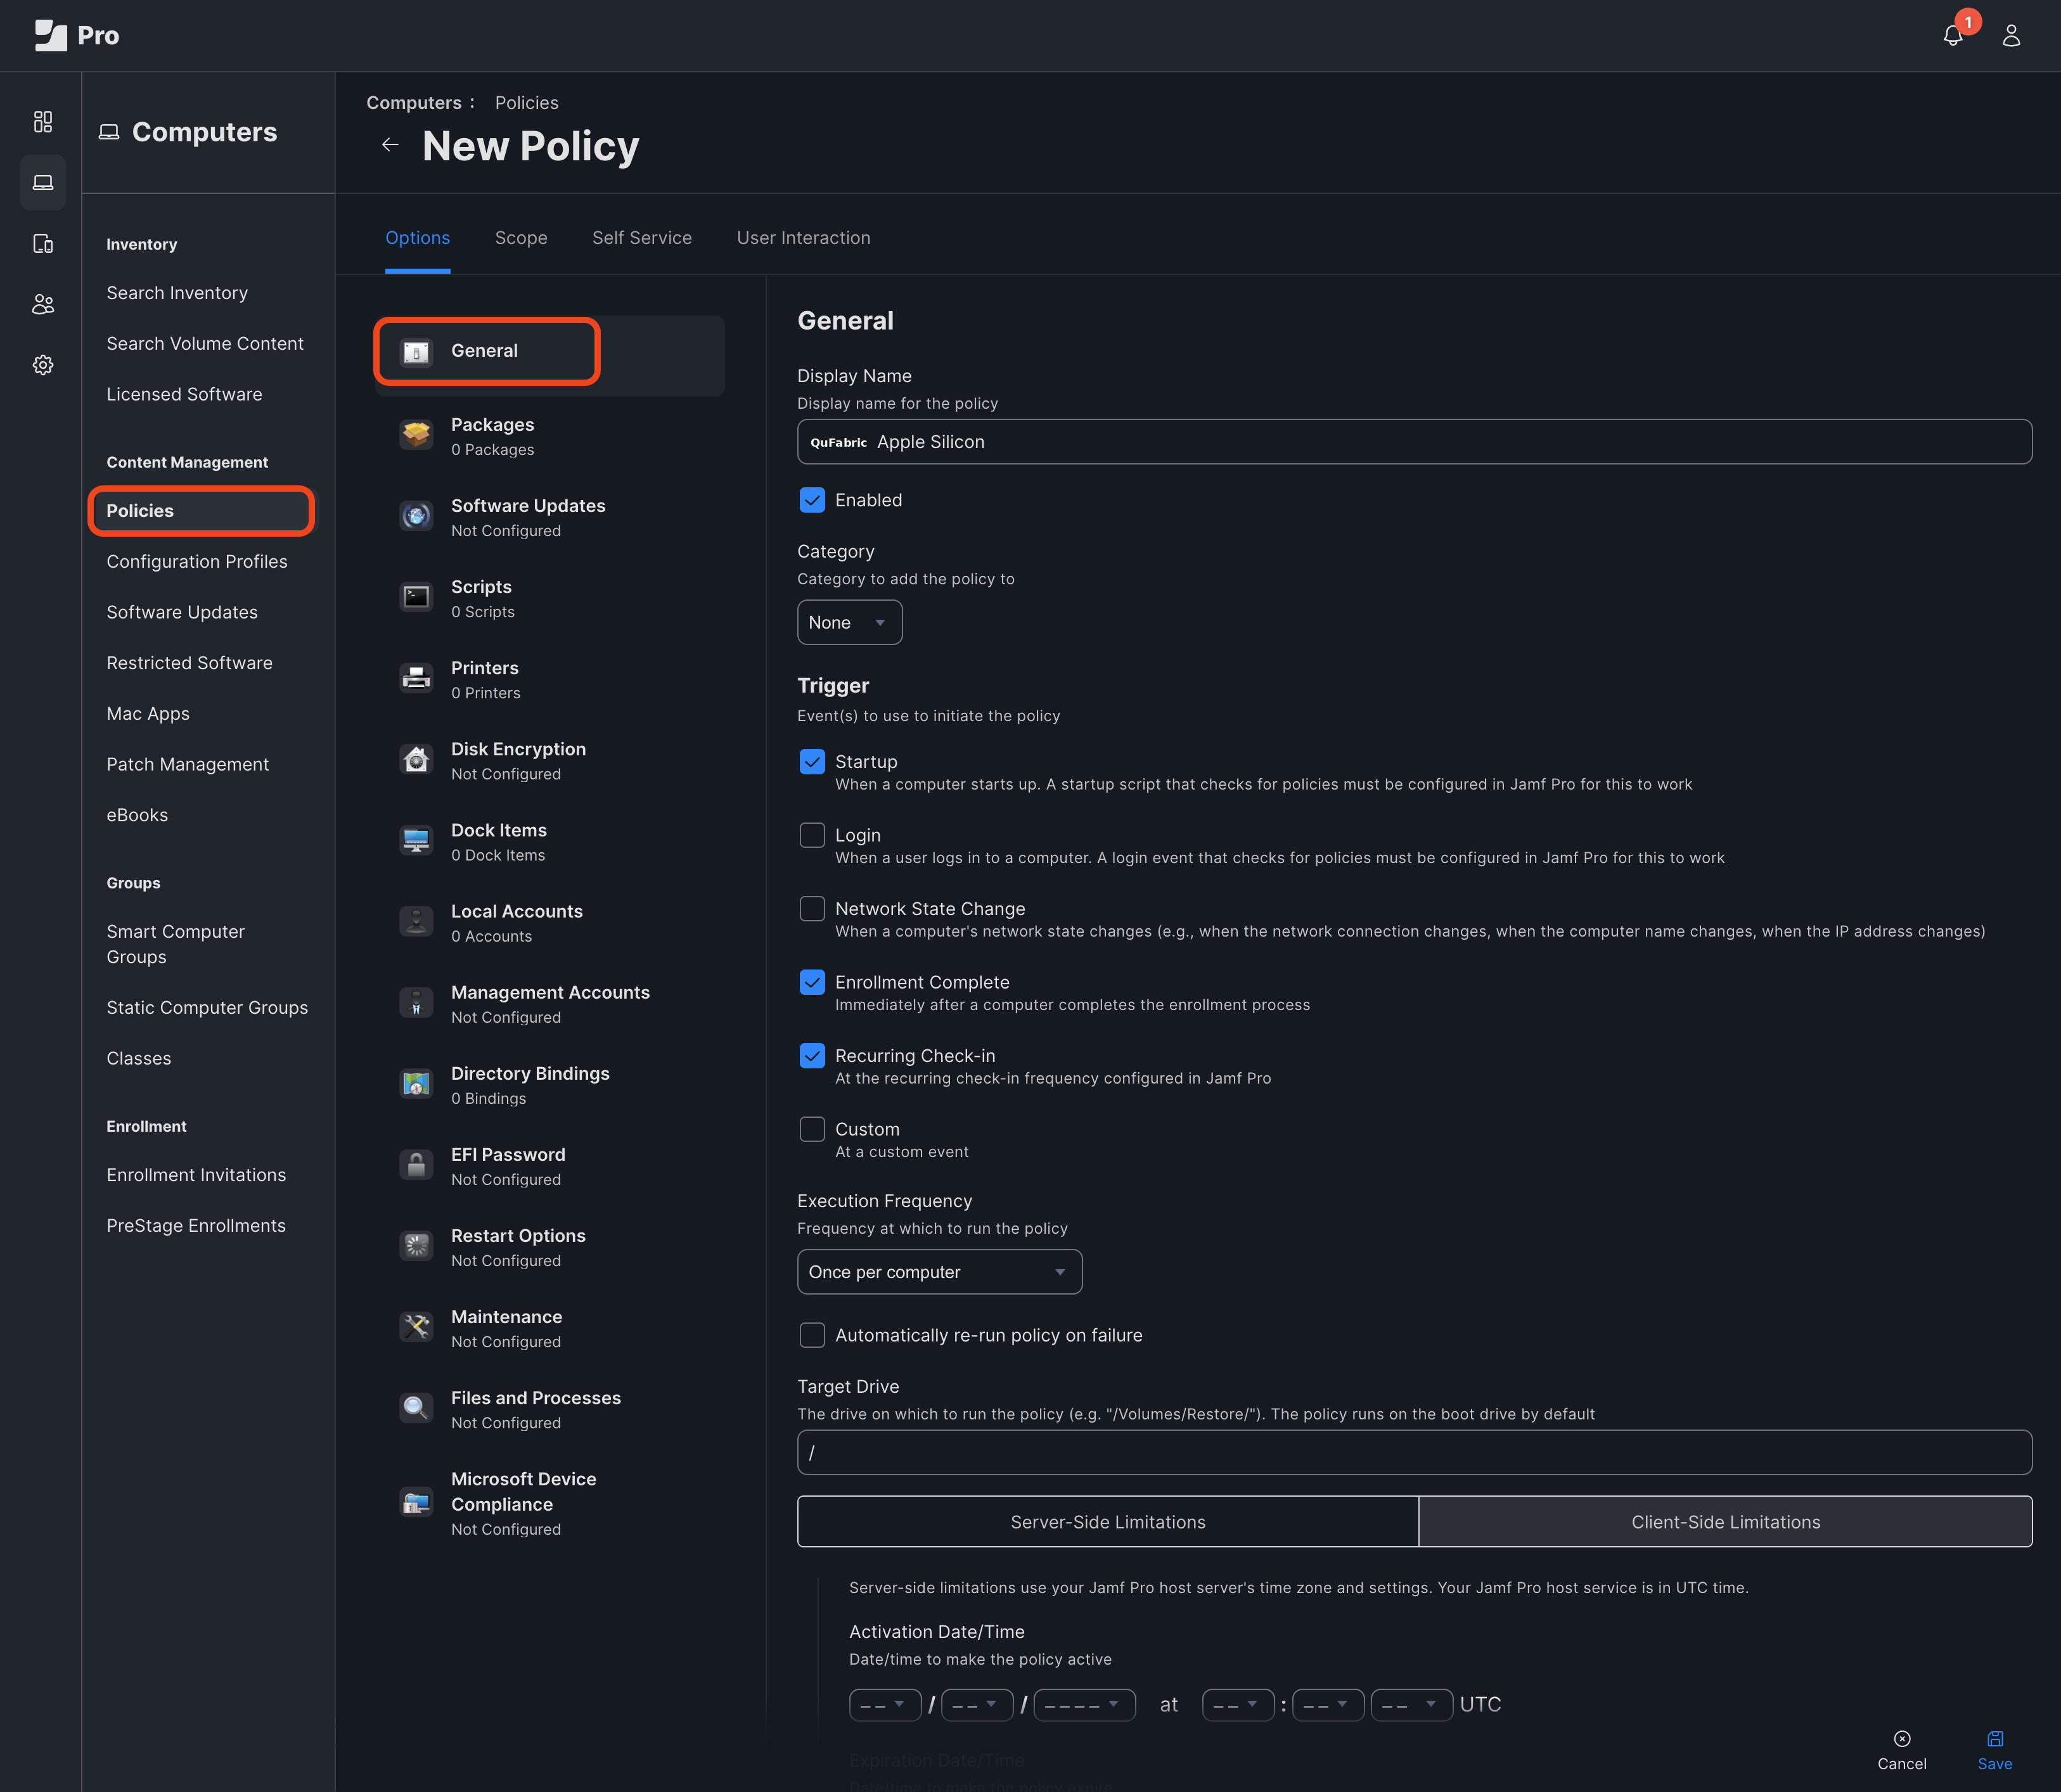
Go to Computers > Computer management > Policies and click + New to create a new policy for the QuFabric app.
In the General section of the Options tab:
- Provide a descriptive name in the Display Name field (e.g., QuFabric Apple Silicon)
In the Trigger options, check the following boxes:
- Startup: Installs QuFabric when the computer starts up.
- Enrollment Complete: Ensures QuFabric is installed immediately after the device is enrolled in Jamf Pro.
- Recurring Check-in: Allows periodic checks to ensure QuFabric is installed and up-to-date.
These trigger selections ensure QuFabric is installed promptly and remains current on all managed devices. Leave the remaining options as default.
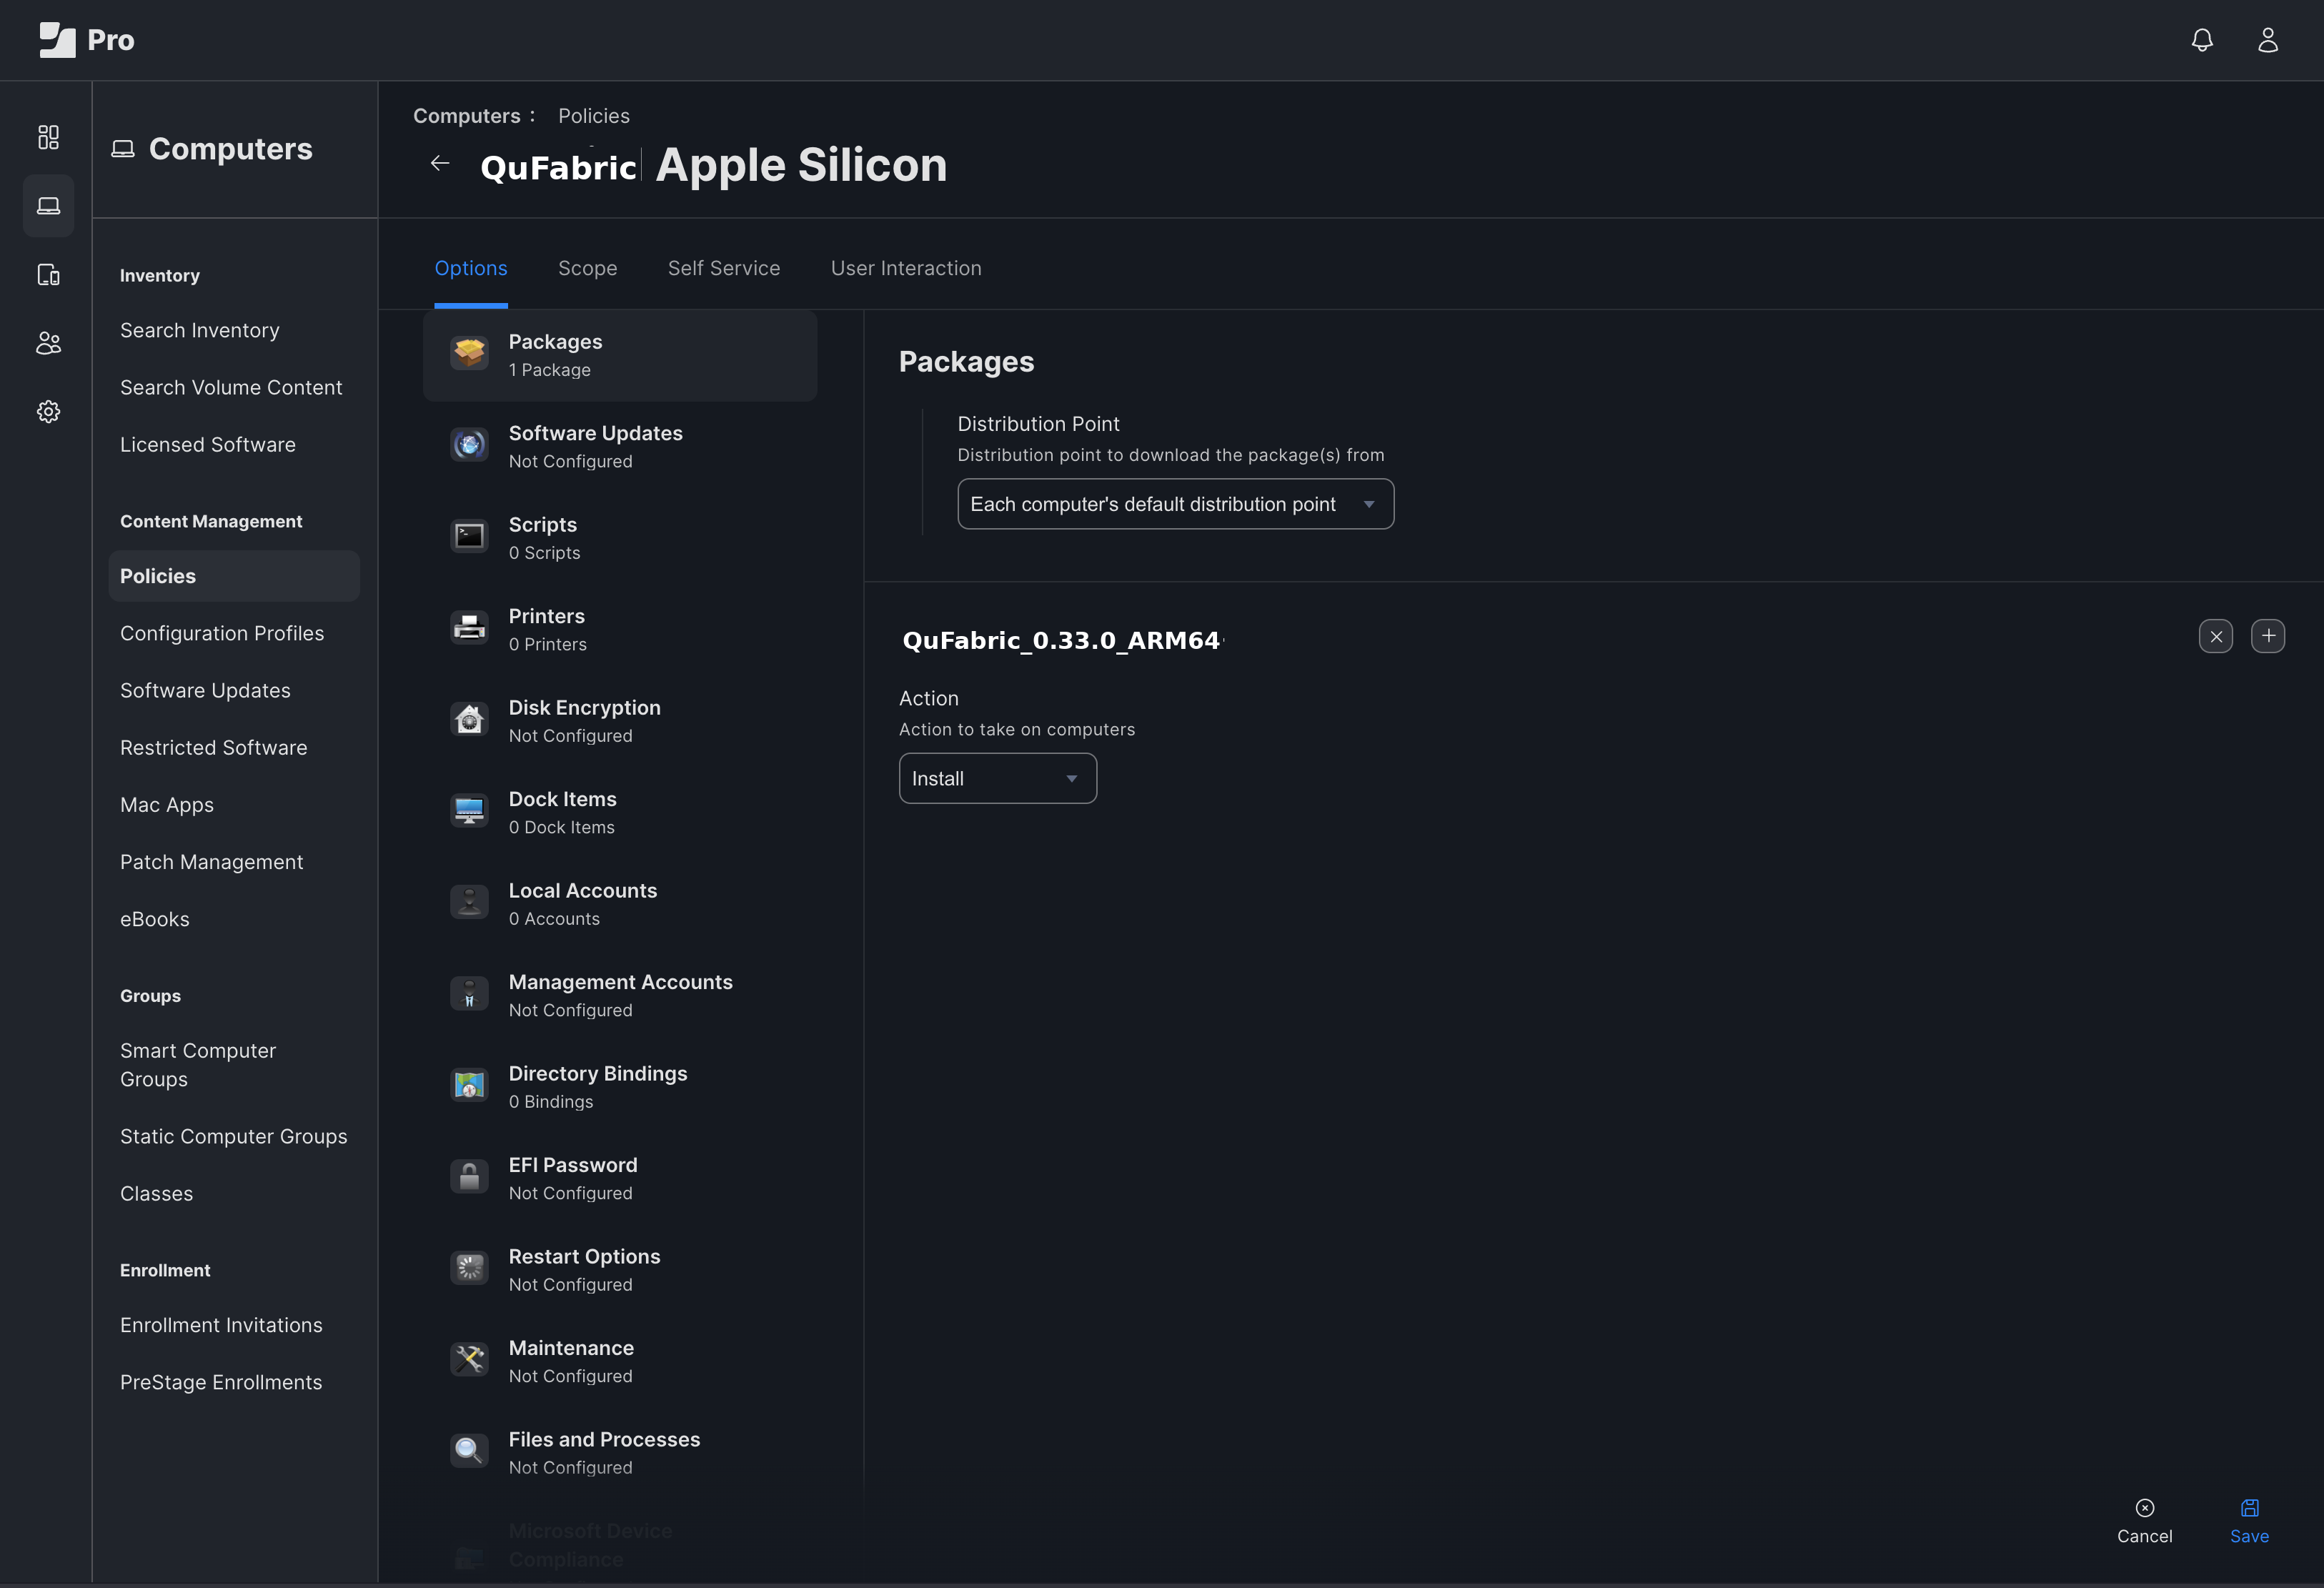
In the Packages section, click Configure and add the corresponding QuFabric package:
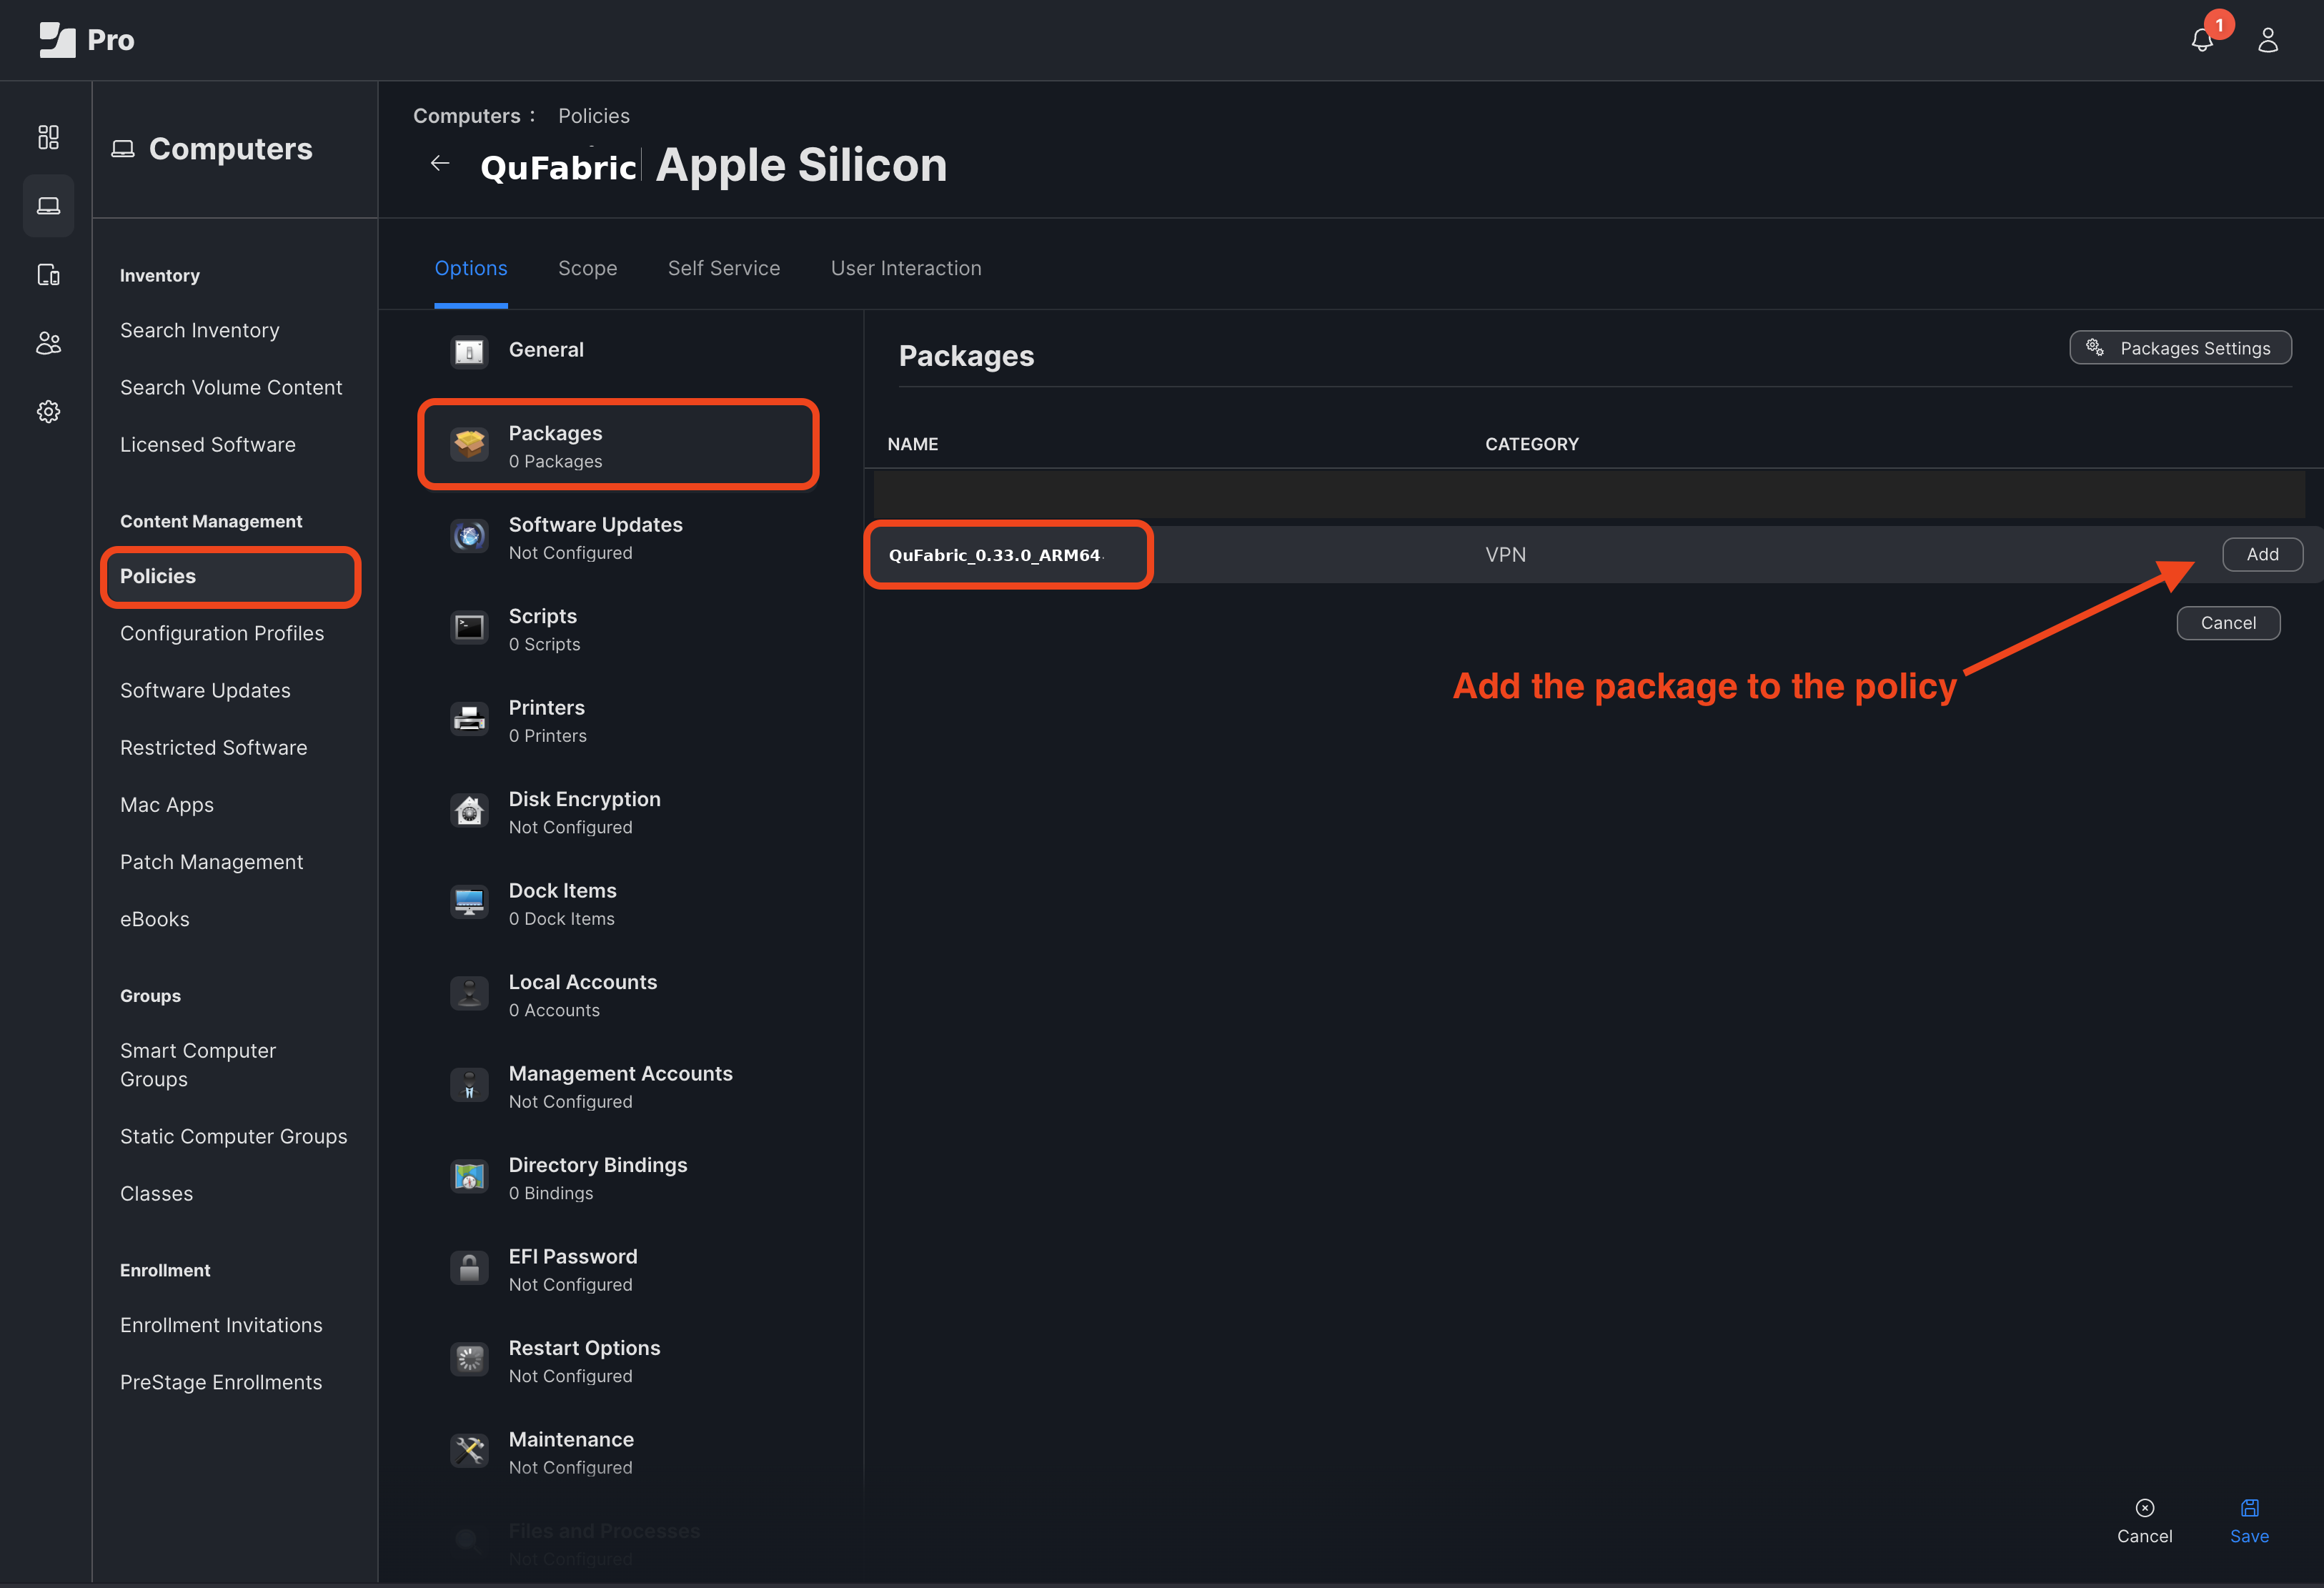
Accept the default values for Distribution Point and Action
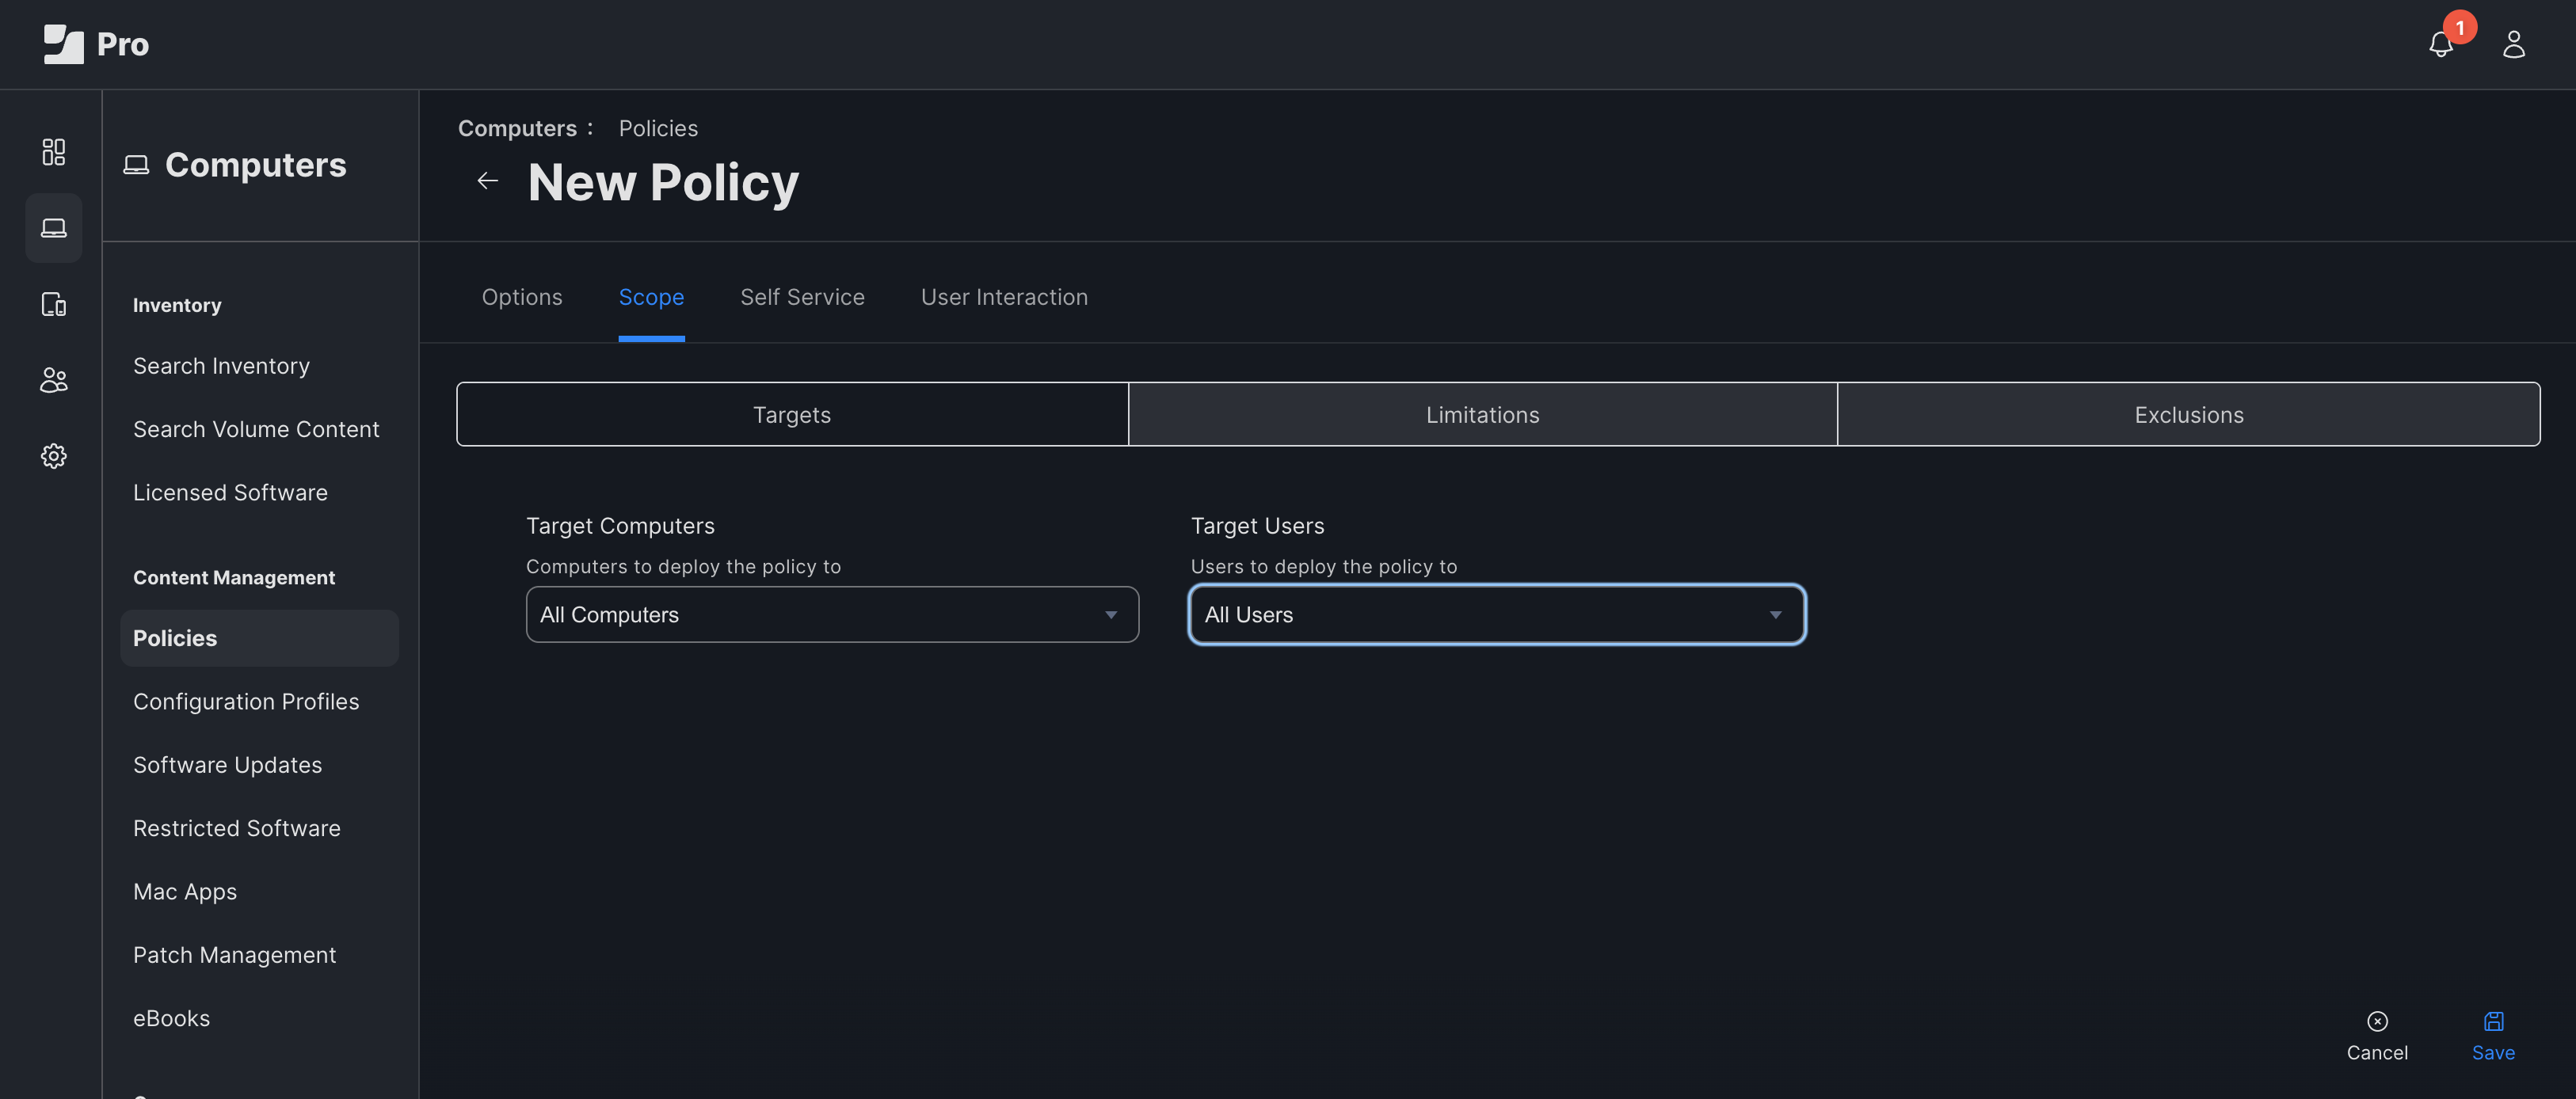
In the Scope tab, specify the target computers (all computers, specific computers or groups, etc.). For simplicity in this example, use All Computers.
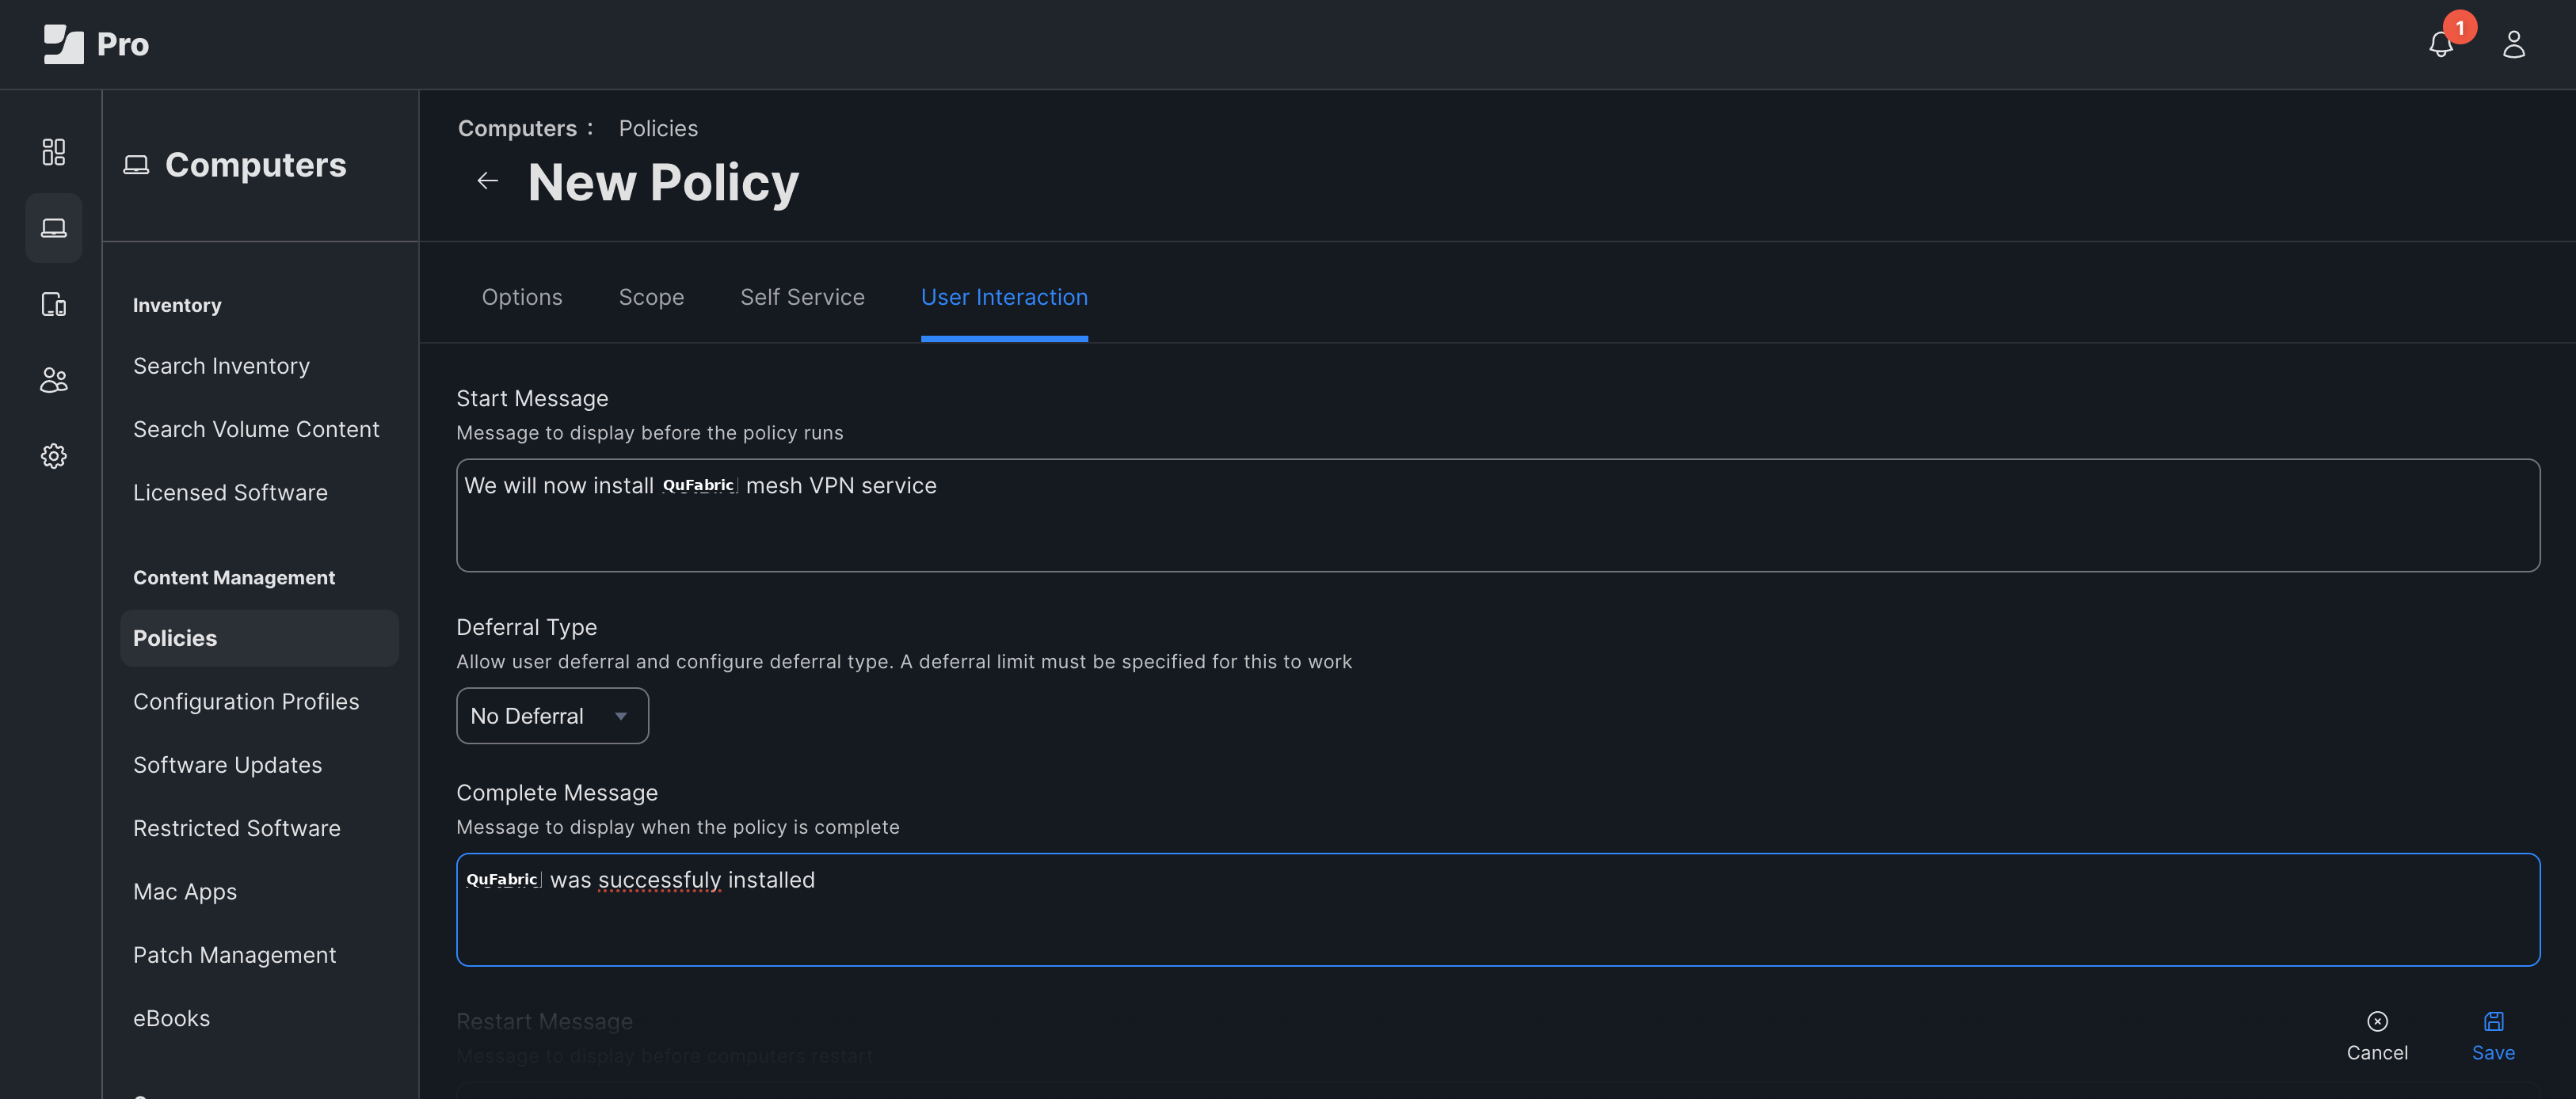
Optionally, in the User Interaction tab:
- Enter messages to display before and after the policy runs.
- This can help inform users about the installation process.
Click Save to finish.

This configuration ensures QuFabric is installed as soon as any machine enrolls, maintaining security across your device fleet.
It's worth mentioning that for first-time devices when QuFabric is launched after installation, it automatically triggers the Single Sign-On (SSO) login flow. This seamless process combines connection setup and authentication, establishing both network connectivity and user verification in one streamlined step.
The SSO flow works as follows:
- When users open QuFabric for the first time, they will be prompted to authenticate.
- The user will be redirected to your organization's identity provider (IdP) login page.
- After successful authentication, the user is automatically connected to the QuFabric network.
- QuFabric then configures itself with the appropriate permissions based on the user's identity and group memberships.
This approach ensures secure and efficient user authentication by integrating with your organization's identity management system. It eliminates the need for separate VPN credentials, simplifying the user experience while maintaining robust security.
Throughout the process, QuFabric logs its actions, which can be useful for troubleshooting purposes. Upon successful completion of the SSO flow and network connection, QuFabric is fully operational, marking the end of a smooth, automated deployment and configuration process.
Verifying the Automated Provisioning Process
After setting up QuFabric deployment policy in Jamf Pro, it's crucial to verify that the automated provisioning process is working correctly. Follow these steps to confirm the successful installation of QuFabric:
- In Jamf Pro, navigate to
Computers > Search Inventory. - Click
Searchto display all enrolled machines. - Select a newly enrolled machine from the list.
- In the device details, go to the
Managementtab and locate thePoliciessection. - Look for the QuFabric policy in the list of applied policies.
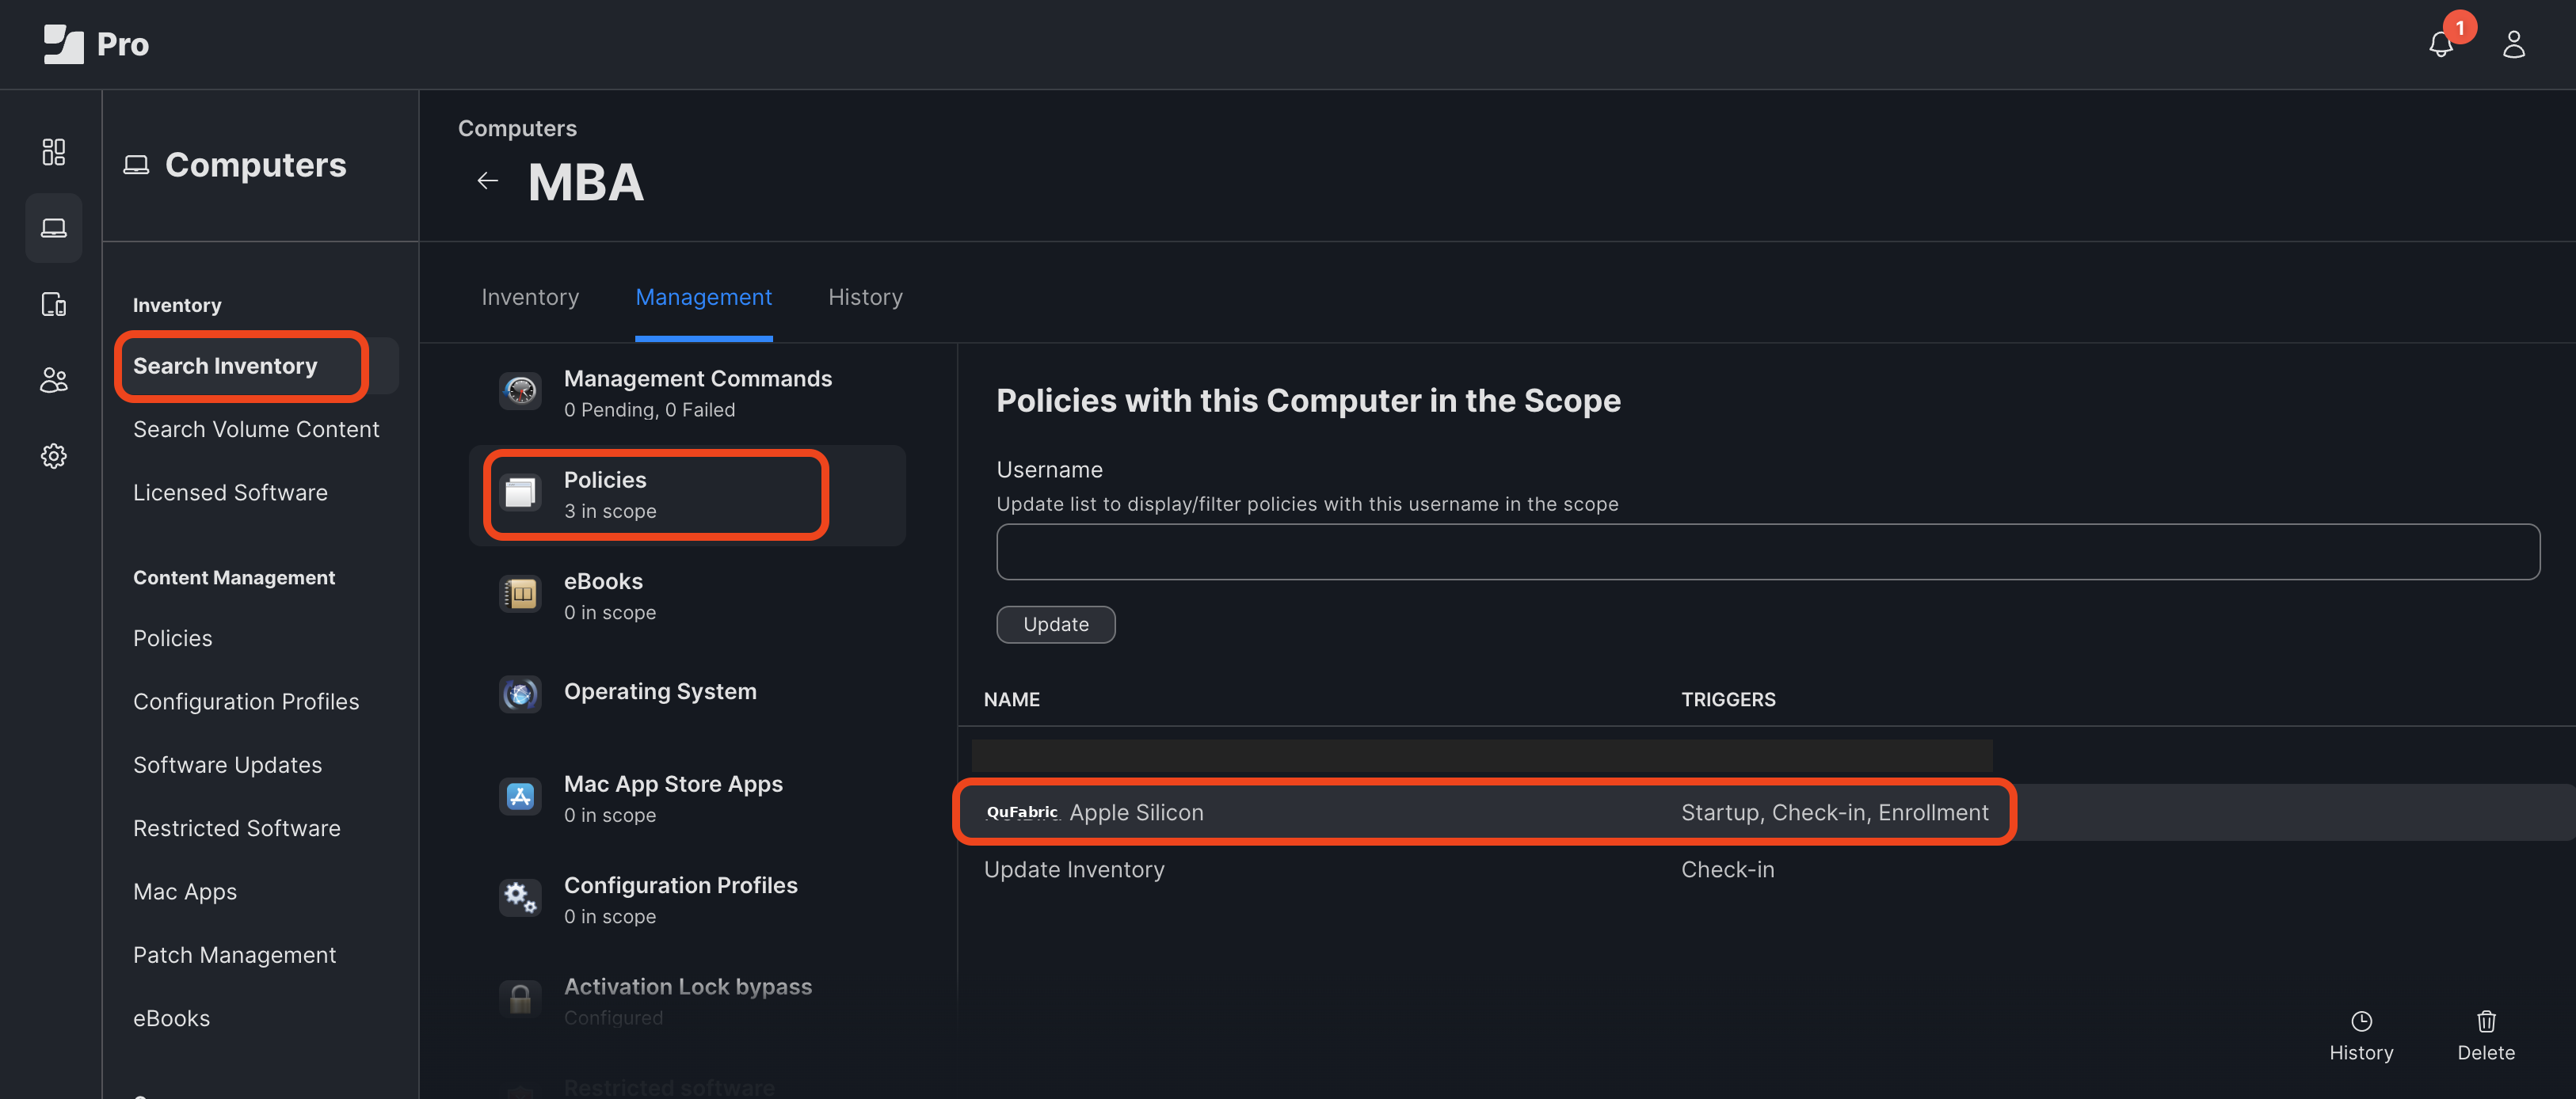
If you see the QuFabric policy listed, that would indicate that QuFabric has been successfully installed on the device.
To further verify the integration, check that the machine has been added to your QuFabric network:
- Log into a QuFabric account with administrative privileges.
- Go to the
Peerssection. - Look for the newly enrolled machine in the list of peers.
If you can see the new machine listed as a peer in QuFabric, this confirms that the automated provisioning process is working correctly and the device has been successfully added to your QuFabric network.
By following these verification steps, you can ensure that your Jamf Pro policy is effectively deploying QuFabric to your managed devices and integrating them into your secure network infrastructure.
This tutorial taught you how to seamlessly integrate QuFabric's VPN solution with Jamf Pro for Apple devices. By configuring QuFabric Access Policies, creating a Jamf Pro policy for automated deployment, and verifying the provisioning process, you've established a solid system for managing secure network access across your organization.