Backend Service Configuration
When a backend service sits behind a reverse proxy, it sees the proxy's IP address as the client IP instead of the real user's IP. Many self-hosted applications require you to configure a list of "trusted proxies" or "known proxies" so they can correctly read the real client IP from the X-Forwarded-For header.
With the QuFabric Reverse Proxy, the proxy connects to your target service through a WireGuard tunnel. From the target's perspective, the source IP of incoming requests is the proxy's QuFabric IP — an address from the 100.64.0.0/10 Carrier-Grade NAT range that QuFabric uses for all peers.
Do not hardcode a specific QuFabric IP (e.g., 100.64.0.47) in your backend's trusted proxy configuration. QuFabric IPs can change when the peer or service restarts, which would cause your backend to stop trusting the proxy and reject forwarded headers.
Cloud-hosted usage limits: QuFabric's cloud-hosted Reverse Proxy is provided on a shared, best-effort basis. High-volume or sustained data transfers may be subject to bandwidth limits, rate limiting, and fair-use policies under the QuFabric Terms of Service. These restrictions do not apply if you self-host QuFabric.
Docker Bridge Networks
If the QuFabric peer and the backend service run as containers on the same Docker bridge network (for example, when using the Home Assistant QuFabric add-on), traffic between them does not traverse the WireGuard tunnel. In this case, the backend sees the QuFabric container's Docker bridge IP (typically from 172.16.0.0/12) rather than a QuFabric IP.
When this applies, add the Docker bridge subnet to your trusted proxy list in addition to the QuFabric range:
100.64.0.0/10
172.16.0.0/12
The default Docker bridge subnet is 172.17.0.0/16, but Docker and add-on managers may assign addresses from anywhere in the 172.16.0.0/12 range. Check your Docker network configuration (docker network inspect <network>) to find the exact subnet if you want a narrower entry.
Recommended Solution
Instead of specifying a single IP, configure your backend to trust the entire QuFabric CGNAT range:
100.64.0.0/10
This covers all possible QuFabric IPs regardless of reassignment. This is safe because only authorized peers within your QuFabric network can reach the target through the encrypted WireGuard tunnel — no external traffic can originate from this range.
If the QuFabric peer runs on the same Docker bridge network as the backend (see above), also add the Docker bridge range 172.16.0.0/12.
If you prefer a narrower QuFabric range, you can use your account's specific network range (typically 100.64.0.0/16). Find your account's range via the API: GET /api/accounts/{id} — look for the network_range field. However, the full /10 range is recommended for simplicity and resilience.
Service-specific Examples
Below are configuration examples for common self-hosted applications. Configuration options may vary by version — consult each application's official documentation for the most current syntax.
Jellyfin
In the Jellyfin admin dashboard:
- Go to Dashboard → Networking.
- In the Known Proxies field, enter
100.64.0.0/10. - Click Save.
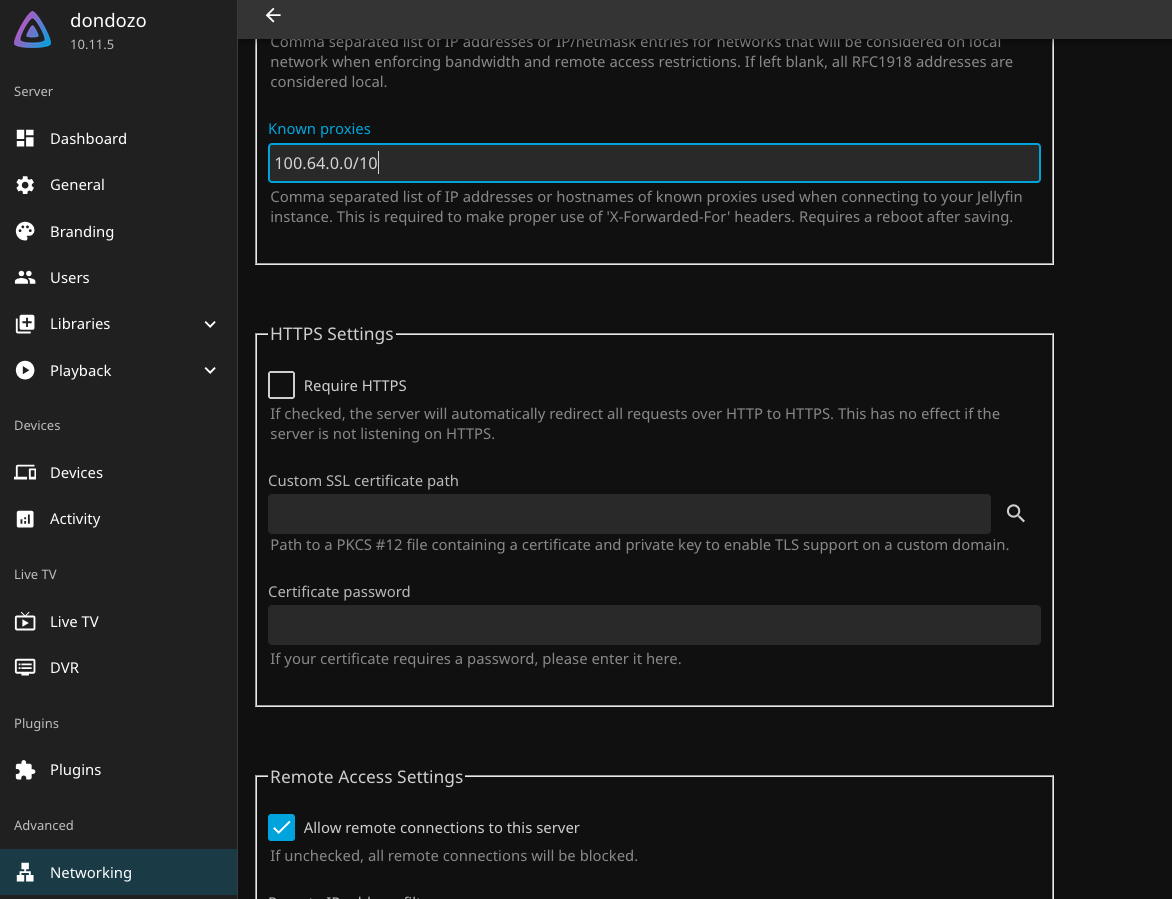
This tells Jellyfin to trust forwarded headers from any QuFabric IP, allowing it to see the real client IP. Additionally, Jellyfin supports adding a 'Base URL' this can be used in conjunction with setting a location while configuring your service on the QuFabric Reverse Proxy service.
Home Assistant
In your configuration.yaml, add or update the http section. You can do this through the File Editor or Studio Code Server add-on, or via the command line if you have terminal access. If you want to learn more about Home Assistant checkout our full guide on the Knowledge Hub.
http:
  use_x_forwarded_for: true
  trusted_proxies:
    - 100.64.0.0/10
If you are running the QuFabric add-on (which runs as a Docker container on the same host), also add the Docker bridge range. Click the button below to get this add-on.

http:
  use_x_forwarded_for: true
  trusted_proxies:
    - 100.64.0.0/10
    - 172.16.0.0/12
Restart Home Assistant after making this change. Without use_x_forwarded_for and a matching trusted_proxies entry, Home Assistant will block requests from the reverse proxy.
Nextcloud
In your Nextcloud config/config.php, add the QuFabric range to the trusted_proxies array:
'trusted_proxies' => ['100.64.0.0/10'],
If you're running NextCloud AIO this should be configured automatically during setup, but if needed you can use sudo docker exec -u 0 -it nextcloud-aio-nextcloud /bin/bash.
Nextcloud supports CIDR notation for IPv4 ranges. When a request arrives from a trusted proxy, Nextcloud reads the real client IP from the X-Forwarded-For header instead of using the proxy's IP.
Verifying your configuration
After updating your backend's trusted proxy settings:
- Access your service through the QuFabric reverse proxy URL.
- Check the backend's access logs — the logged client IP should be the real user's IP, not a
100.64.x.xaddress. - If the backend still shows a QuFabric IP, verify that Pass Host Header is enabled in your reverse proxy service's Settings tab and that you have restarted the backend service after changing its configuration.
You can also monitor requests from the QuFabric side using Access Logs.
Related pages
- Reverse Proxy Overview — setup, concepts, and service management
- Access Logs — monitor traffic to your reverse proxy services
- How QuFabric Works — details on IP assignment from the CGNAT range